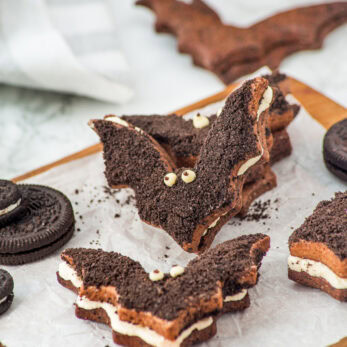
Bat Sandwich Cookies (Gluten-Free)
These gluten-free bat sandwich cookies are a perfect combination of Halloween candy and cookie in one delicious treat, making them ideal for a Halloween party. This Halloween treat is made with gluten-free ingredients, they’re great for fall baking, Halloween parties, or your next fall festival.
Servings: 10
Equipment
Ingredients
For The Cookies
- 1/2 cup Butter at room temperature
- 1/2 cup Coconut sugar
- 1 Egg
- 1 tbsp Vanilla extract
- 1 cup Gluten-free flour
- 1/4 cup Arrowroot
- 1/2 cup Cocoa powder
- 1/4 tsp Salt
- 8 Oreos cookies
- Dark and white chocolate for eyes
For The Filling
- 1/2 cup Butter
- 2 cups Confectioner's erythritol or powdered sugar
- 1 tbsp Vanilla
Instructions
- Prepare the dough:In a large bowl, beat the butter and sugar until creamy and well combined. Add the egg and vanilla extract, and continue beating until fully incorporated.2. Incorporate the dry ingredients:In the same bowl, add the flour, arrowroot, cocoa powder and salt. Mix with a spatula or your hands until you form a smooth and uniform dough . 3. Chill the dough: Shape the dough into a rectangular block, wrap it in plastic wrap, and freeze for at least 3 hours or overnight . 4. Process the Oreos:Remove the cream filling from the Oreo cookies. Crush the cookies, using a food processor or a rolling pin, into small crumbs.5. Shape the cookies:Preheat your oven to 350°F (180°C).Remove the dough from the freezer and roll it out with a rolling pin to about 1/4 inch (0.5 cm) thick, dusting lightly with flour if needed. Sprinkle the crushed Oreos on top of the doughnand gently roll over them with a rolling pin to help them stick.Use a bat-shaped cookie cutter to cut out the cookies and carefully transfer them onto a baking sheet lined with parchment paper.From another portion of dough, cut out plain bat shapes (without Oreos)to use as the bottoms of the sandwich cookies.6. Bake the cookies:Bake in the preheated oven for 8 minutes.Remove from the oven and let them cool completely before assembling.7. Make the filling:In a bowl, beat the butter until soft. Gradually add the erythritol or powdered sugar and beat for 9 minutes, until light and fluffy.Add the vanilla extract and beat for 1 more minute to combine.Transfer the cream filling into a piping bag.8. Decorate:Pipe the filling onto a plain bat cookie and top with an Oreo- sprinkled bat cookie.Decorate the bats with little eyes made from white and dark chocolate, using atoothpick for detail.
Notes
Vegetarian Version: Substitute margarine for the butter. The flavor will be slightly different, but the texture will be fine.
Sugar Type: For a more intense caramel-like flavor, use brown or muscovado sugar.
Decoration: Instead of decorating with chocolate, you can use mini candy eyes, white sprinkles with a dot of chocolate, or colored sugar pearls.
Filling Type: Substitute the buttercream for chocolate ganache (cream + melted chocolate) or a tangy cream cheese frosting.
Freezing the Dough: If you're short on time, you can refrigerate the dough for 1 to 2 hours instead of freezing it overnight.
Bat Cutter: If you don't have a bat-shaped cutter, use other fun shapes (pumpkin, ghost, star) and follow the same technique.
Room Temperature Butter: Make sure the butter is soft but not melted. If it’s too cold, it won’t mix well with the sugar, and if it’s too warm, the cookies might spread too much during baking.
Don’t Skip Chilling: Chilling the dough is crucial for the cookies to hold their shape and not spread too much while baking. If possible, chill the dough for more than 3 hours, or even overnight, for better results.
Flouring the Surface: Use a light dusting of flour on your rolling pin and work surface to prevent sticking, but avoid using too much to maintain the cookie flavor.
Consistent Thickness: Roll the dough evenly to ensure all cookies bake at the same rate and achieve a uniform texture.
Freezing Before Baking: A quick freeze before baking helps the cookies maintain their sharp edges and design.
Storage: Store decorated cookies in an airtight container in the refrigerator for approximately 5 days.