How to Make Gluten-Free Sourdough Bread
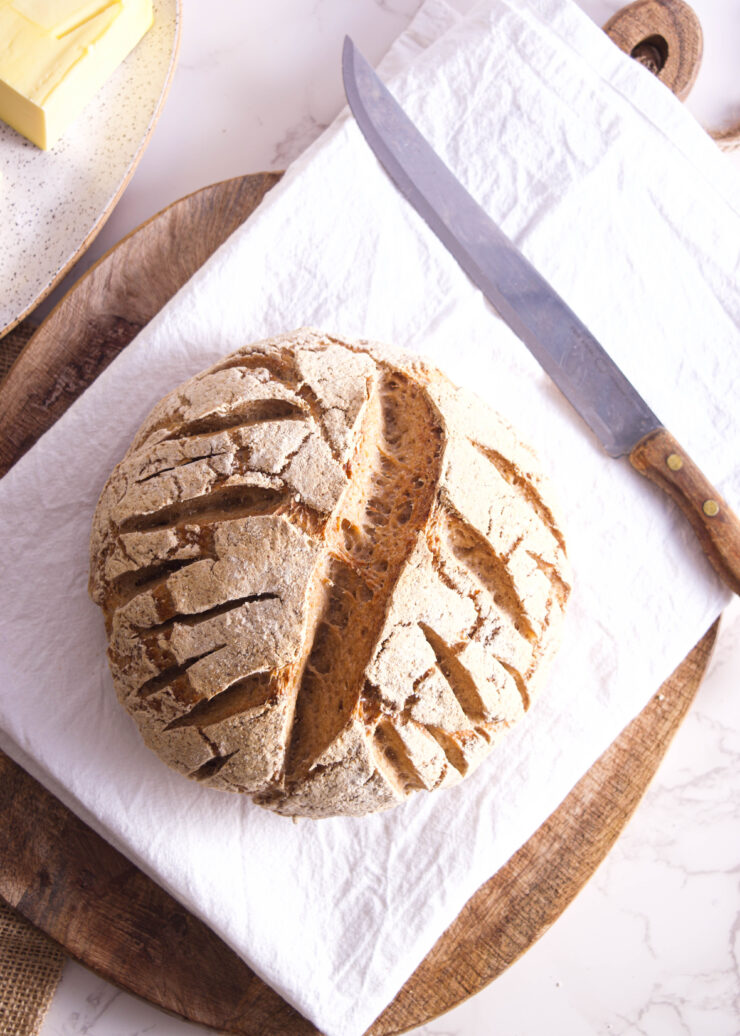
Learn how to make a delicious gluten-free sourdough bread recipe with defined scoring and a tender interior. A perfect homemade loaf of bread made with care and expertise, our sourdough bread boasts a perfectly crispy crust, a tender crumb, and a delightful tang that will tantalize your taste buds and leave you craving more.

Gluten-Free Sourdough Bread Recipe
Sourdough bread has been a staple in diets worldwide for centuries, loved for its tangy flavor, chewy texture, and health benefits. Saturday was a bake day in my family. We used to bake delicious sourdough with an old sourdough starter that my great-grandmother made and press down to the younger generation. We did not make gluten-free sourdough bread then, but I make one every week now.
For people with gluten sensitivities or celiac disease, enjoying traditional sourdough has been off-limits, but now we have a solution that is gluten-free sourdough!
Made using alternative flour such as rice flour, buckwheat flour, or a gluten-free flour blend, gluten-free sourdough offers a delicious solution for bread lovers seeking to avoid gluten.
The Art of Gluten-Free Sourdough Baking
Baking gluten-free sourdough is both an art and a science. Unlike traditional sourdough, which relies on gluten to create its characteristic structure, gluten-free sourdough requires a bit of finesse and experimentation to achieve the perfect balance of flavor, texture, and rise. It requires commitment, time, and especially patience. You must be willing to go through some failures until you figure out your own way and relationship with the sourdough and figure out what works for you. I went through it, too, but it was all worth it! You can make delicious gluten-free sourdough bread.
Despite the challenges of gluten-free baking, the rewards are well worth the effort. Gluten-free sourdough offers a depth of flavor and complexity that rivals its gluten-containing counterparts. From crusty boules to soft sandwich loaves, the versatility of gluten-free sourdough knows no bounds.
Moreover, gluten-free sourdough is not only delicious but also nourishing. Rich in beneficial bacteria and enzymes produced during the fermentation process, gluten-free sourdough is easier to digest and may even offer some of the same health benefits as traditional sourdough, such as improved gut health and nutrient absorption.
While precision in measurements and adherence to recipes are essential, there’s also room for intuition in the process.
Numerous factors influence the outcome, including environmental conditions like temperature variations, water quality, and the specific flour brands utilized. While understanding scientific principles is crucial and adds to the enjoyment, trusting your instincts also plays a significant role.
With each batch of sourdough bread you make, you’ll gain a deeper understanding of the process, leading to increased confidence and intuition. Many individuals express initial apprehension about sourdough baking, but with dedication and patience, anyone can master the craft.

The Gluten-Free Sourdough Starter
One key to successful gluten-free sourdough baking is using a sourdough starter made with gluten-free flour. This starter provides the necessary fermentation and leavening agents to help the bread rise and develop its signature tangy flavor. The starter serves as the primary leavening agent in gluten-free dough bread. Through fermentation, wild yeast and lactobacilli bacteria present in the starter produce carbon dioxide gas, which helps the dough rise and develop a light, airy texture.
A healthy starter is a crucial part of making this bread and making it rise. Make sure that your starter is at least four weeks old.
You can read how to make a gluten-free sourdough starter here. Choose the flour you want to use, and enjoy the process.
The texture is key. Your starter needs to be healthy, thick, and have a pasty consistency. You will know it has enough flour to feed on and get you some good bubbling action when it looks like that.
When your starter doubles in size and has visible air bubbles, it is ready to use. I like to keep a rubber band around my starter jar. Using the rubber, you will easily recognize it when it doubles in size.
Refrain from comparing your gluten-free starter to a gluten starter. Gluten-based sourdough starters are a diffrent animal! They grow so fast and can sometimes even triple in size. Just have some patience and wait for her to grow. I named my starter Betsy, and she is doing great!
Sometimes, the starter won’t double in size. If that is the case, increase your feeding schedule to twice daily. This will help it rise.
Additionally, gluten-free sourdough often benefits from adding ingredients such as psyllium husk, xanthan gum, or guar gum, which help mimic the elasticity and structure that gluten provides in traditional bread dough.
What is The Most Important Thing in Making Gluten-Free Sourdough Bread
The most crucial thing in making gluten-free sourdough bread is the right ingredients and techniques to ensure a flavorful, well-textured loaf. Here are several essential aspects to focus on:
- Flour Blend: Selecting the right combination of gluten-free flour is paramount. A blend of different flours, such as rice flour, buckwheat flour, tapioca flour, or sorghum flour, can help replicate the texture and flavor of traditional wheat bread. Experiment with different combinations to find what works best for your taste preferences.
- Sourdough Starter: Developing a healthy and active gluten-free sourdough starter is crucial. Use a gluten-free flour, such as brown rice flour or sorghum flour, to create your starter. Maintain it regularly with feedings to ensure optimal fermentation and leavening power.
- Hydration: Gluten-free flours absorb liquid differently than wheat flour. Pay close attention to the hydration level of your dough and adjust as needed to achieve the right consistency. Gluten-free sourdough dough may require a slightly higher hydration level to prevent it from becoming too dense.
- Fermentation: Allow your gluten-free sourdough dough to ferment properly to develop flavor and improve texture. Fermentation times may vary depending on factors such as room temperature and the activity of your sourdough starter. Patience is key; don’t rush the fermentation process.

Why Use Psyllium Husk
Psyllium husk plays a crucial role in gluten-free sourdough recipes, particularly in helping to improve the texture and structure of the bread. It makes the dough workable, and it helps to make your bread stretchy and chewy. Here’s how it contributes to the success of gluten-free sourdough baking:
- Binding Agent: Psyllium husk is a natural binding agent with mucilaginous properties. When mixed with water, it forms a gel-like substance that helps bind the ingredients together, mimicking the elasticity that gluten provides in traditional bread dough. This is especially important in gluten-free baking, where the absence of gluten can result in a crumbly or dense texture.
- Improved Dough Handling: The addition of psyllium husk helps improve the handling characteristics of gluten-free sourdough dough. It adds viscosity and structure, making the dough easier to shape and work with during the shaping and proofing stages.
- Increased Moisture Retention: Psyllium husk helps retain moisture in the dough, preventing it from drying out during baking. This results in a softer, more tender crumb in the finished bread, enhancing its overall quality and texture.
- Enhanced Rise: By providing structure and support to the dough, psyllium husk can also aid in achieving better rise and oven spring in gluten-free sourdough bread. This leads to a lighter, airier loaf with improved volume and texture.
Psyllium husk and psyllium powder come from the same source, the seeds of the Plantago ovata plant. However, they differ in texture and usage.
- Psyllium husk has a coarse, gritty texture and is often used in recipes requiring texture and structure, like gluten-free baking.
- Psyllium powder, being finely ground, dissolves more easily in liquids and is versatile in various recipes, including smoothies and beverages.
When substituting one for the other, adjust the quantity accordingly. Both can be beneficial in gluten-free baking, depending on the desired texture of the final product.
In this recipe, you need to use psyllium husk, not the psyllium husk powder!
How to Choose the Gluten-Free Flour Blend
Selecting the right flour blend is crucial for successful gluten-free sourdough baking. Here’s how to pick the best flour blend:
- Consider Flavor and Texture: Different gluten-free flours have diffrent flavors and textures. Experiment with combinations to find a blend that best mimics the taste and texture of traditional sourdough bread.
- Texture Enhancement: Incorporate flours that contribute to a desirable texture in your blend. For example, rice flour provides structure, while tapioca flour adds lightness and chewiness. Buckwheat flour can impart a nutty flavor and enhance the overall texture of the bread.
- Nutritional Benefits: Consider the nutritional content of the flour in your blend. Some gluten-free flours, such as quinoa flour and teff flour, are rich in protein and other nutrients, adding nutritional value to your bread.
- Experiment and Adjust: Be bold and experiment with different flour combinations until you find the perfect blend for Don’ttaste preferences and dietary needs. Keep notes on the ratios and results of each blend to help refine your recipe over time.
Types of Flour
- Rice Flour: Rice flour is a versatile option commonly used in gluten-free baking. It provides structure and a neutral flavor to the bread. Both white rice flour and brown rice flour can be used. Choose a superfine version to help with texture.
- Sorghum Flour: Sorghum flour has a slightly sweet and nutty flavor, making it a popular choice for gluten-free baking. It adds moisture and helps improve the texture of the bread.
- Tapioca Flour/Arrowroot: Tapioca flour, also known as tapioca starch, adds lightness and chewiness to gluten-free bread. It helps create a soft and tender crumb.
- Buckwheat Flour: Despite its name, buckwheat is naturally gluten-free and not related to wheat. Buckwheat flour adds a rich, nutty flavor and enhances the overall texture of the bread.
- Potato Starch/Flour: It helps to make the bread flufier and balance the grain flours.
- Quinoa Flour: Quinoa flour is high in protein and nutrients, making it a nutritious choice for gluten-free baking. It has a slightly earthy flavor and helps improve the nutritional profile of the bread.
- Millet Flour: Millet flour has a mild flavor and adds a delicate texture to gluten-free bread. It works well as part of a flour blend and contributes to a soft and fluffy crumb.
- Oat Flour: Oat flour adds a nutty flavor and a slightly denser texture to baked goods. It is rich in fiber, protein, and various nutrients, making it a popular choice for those seeking a nutritious flour option.
- Coconut Flour: Coconut flour is made from dried coconut meat and is high in fiber. It adds moisture and a subtle coconut flavor to the bread. It’s highly absorbent, so it’s best used in combination with other flours.
- Almond Flour: Almond flour is made from ground almonds and adds a rich, nutty flavor to gluten-free bread. It’s high in protein and healthy fats, contributing to a moist and flavorful loaf.
- Teff Flour: Teff is a nutritious whole-grain flour with a slightly sweet and earthy flavor. It adds moisture and a unique texture to gluten-free bread.
- Chickpea Flour: Chickpea flour, also known as gram flour or besan, has a nutty flavor and adds protein and fiber to gluten-free bread. It helps improve the structure and texture of the bread.
These are just a few examples of the many gluten-free flours available. You can experiment with different combinations and ratios to create a flour blend that suits your taste preferences and dietary needs.

Gluten-Free Bread Baking Terminology
Here’s a list of common bread-baking terminology that you may encounter:
- Bulk Fermentation: The first stage of fermentation where the entire batch of dough is allowed to rise after mixing. The dough develops flavor, structure, and elasticity during bulk fermentation as yeast ferments and produces carbon dioxide gas.
- Proofing: The final rise of shaped dough before baking. This allows the dough to expand and develop volume, resulting in the finished bread’s light and airy texture.
- Scoring: Making shallow cuts or slashes on the surface of the dough before baking. Scoring allows steam to escape during baking, controls the expansion of the dough, and creates decorative patterns on the crust.
- Oven Spring: The rapid rise of dough in the oven during the first few minutes of baking. Oven spring occurs as yeast produces carbon dioxide gas, and steam generated from moisture in the dough expands, causing the dough to puff up and develop a light, airy texture.
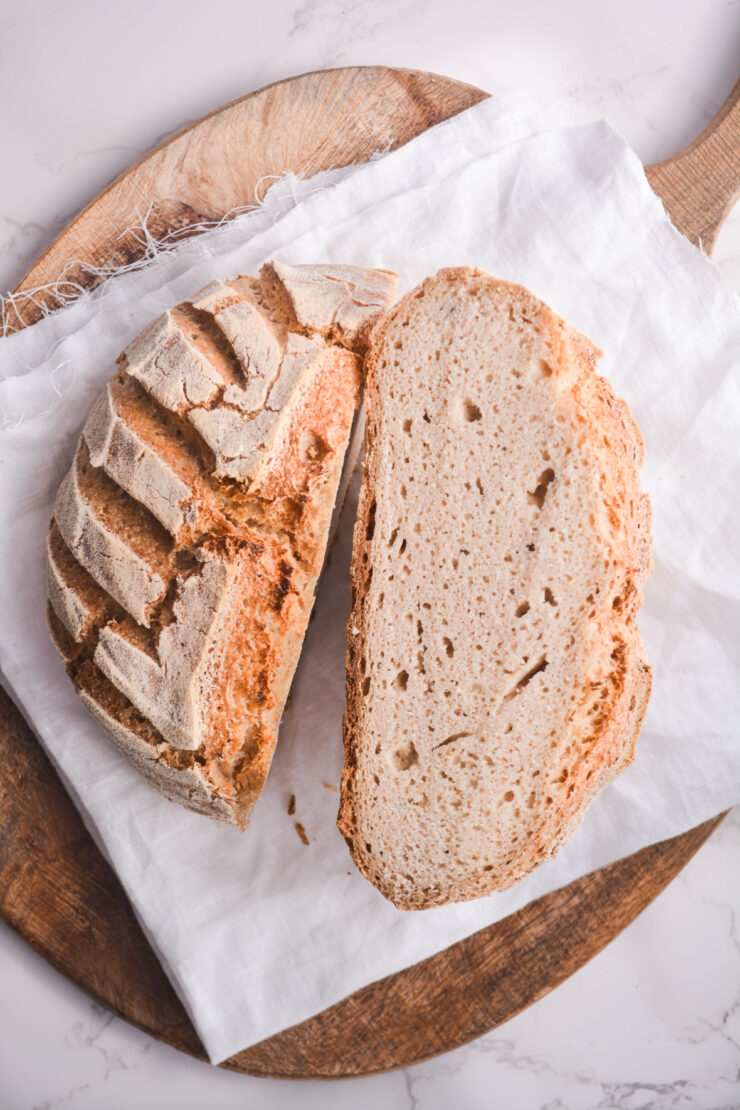
- Crumb: The interior texture of bread, including the size and distribution of air pockets or holes. A desirable crumb is light, tender, and well-aerated, with a uniform structure throughout.
- Crust: The outer layer of bread formed during baking. Depending on baking time, temperature, and ingredients, the crust can vary in color and texture, ranging from golden brown and crisp to dark and chewy.
- Fermentation: The process by which yeast and bacteria metabolize sugars in the dough, producing carbon dioxide gas, alcohol, and organic acids. Fermentation develops flavor, aroma, and texture in the bread and also improves digestibility.
- Starter: A mixture of flour and water containing wild yeast and lactobacilli bacteria. Starters are used to leaven bread through fermentation and contribute flavor and acidity to the dough.
- Preferment: A portion of the dough that is mixed and allowed to ferment separately before being incorporated into the final dough. Preferments, such as poolish or sponge, enhance flavor and texture in bread by developing complex sugars and acids during fermentation.
- Lame: A “lame” is a tool used in bread baking, particularly in the making of artisan-style bread. It is a small, handheld instrument with a razor blade or very sharp edge attached to one end. The purpose of a lame is to score or slash the surface of bread dough just before it is placed in the oven for baking. Scoring the dough helps control the expansion of the bread during baking, allowing it to rise evenly and preventing it from cracking in undesirable ways. This scoring also creates decorative patterns on the crust of the bread.
- Banneton: A banneton, also known as a proofing basket, is a basket used in bread baking to support the dough as it rises and to help it maintain its shape during proofing. Bannetons are typically made from natural materials like cane or rattan, which allow the dough to breathe and prevent it from sticking to the sides of the basket.
Equipment
- Starter
- Mixing Bowls
- Measuring Cups and Spoons
- Kitchen Scale
- Dough Scraper/Bench Knife
- Dutch Oven
- Parchment Paper or Baking Mat
- Lame or Sharp Knife
- Banneton Basket: If you dont have one, you can use a bowl lined with a clean cloth towel.
- Stand Mixer: Optional, but I like to use it.
- Cooling Rack: Allows freshly baked bread to cool properly by transferring it to a cooling rack. This prevents the crust from becoming soggy and helps the bread cool evenly.
Getting your starter ready for baking
To ensure optimal results in your gluten-free sourdough bread, it’s essential to have your starter at peak activity before mixing your preferment. Here’s a simple guide to getting your starter ready for baking:
- Feed your starter generously, providing approximately 150g each of water and flour. This hearty feeding encourages vigorous activity, which is vital for successful breadmaking.
- If your starter has been refrigerated, conduct two feedings before commencing breadmaking. This ensures your starter is thoroughly revitalized and primed for baking.
How to make gluten-free sourdough bread
Start by mixing active starter, water, and flour in a bowl. Cover with plastic wrap and set it aside in a warm place. It can last 5- 20 hours, depending on how sour you want the bread to be. The longer you ferment it, the sourer the bread will be. Look for the preferred to be bubbly—you will know it is ready to mix.
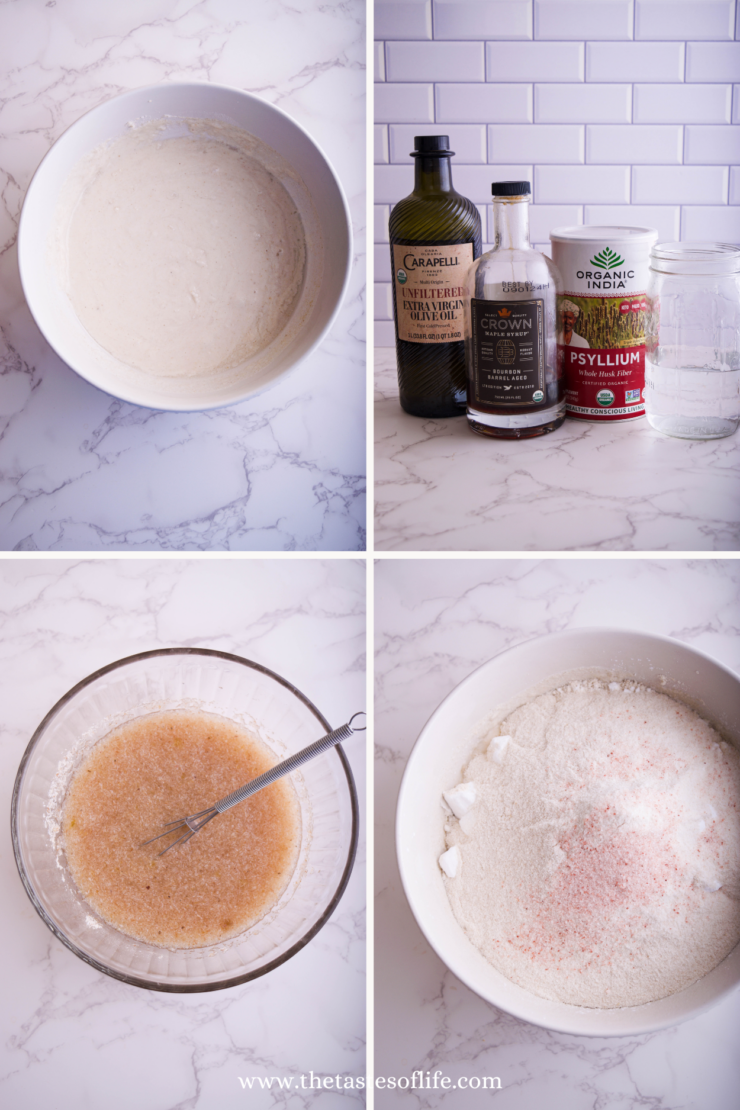
- Begin by mixing your psyllium husk, sweetener, and water to create a gel-like mixture. Set this aside to gel while you prepare the flour blend.
- In a large bowl or stand mixer, combine your selected flours and starches along with salt. This is also the stage to incorporate any dry seasonings or herbs for added flavor.
- Integrate the psyllium gel mixture into your active starter, olive oil if desired, and any other wet ingredients. Ensure thorough mixing to create a cohesive dough.
- Gradually add the wet ingredients to the flour mixture, using a spoon or dough hook to combine until a smooth dough forms.
- Transfer the dough onto a clean, smooth work surface and knead it into a smooth ball. Shape the dough as desired, ensuring proper sealing of seams for a tidy appearance.
- Place the shaped dough into a proofing basket or a bowl lined with a clean tea towel. Cover and allow the dough to proof for approximately three hours at room temperature or overnight in the refrigerator.
Understanding Proofing
Proofing is a critical stage where the dough undergoes fermentation, resulting in the formation of gases that contribute to its airy texture and flavor profile. Factors such as temperature and humidity significantly influence proofing time:
- In moderate climates, a 3 to 4-hour proofing period is typically sufficient, with adjustments required for warmer or cooler environments.
- Refrigerating the dough overnight not only extends proofing time but also enhances the bread’s sourness.
When the dough has visibly increased in size, feels soft and airy to the touch, and springs back quickly upon pressing, it is ready for baking.
In the dry climate, 4 hours is sufficient. In warm and humid weather, it can take less than 4 hours.
If your loaf is proofing too quickly – decrease the amount of starter to give your bread enough time to proof and develop.
Proofing your bread in a cold climate can take more than 4 hours.
A well-proofed loaf will visibly increase in size, though not necessarily double, and feel soft, airy, and responsive when gently pressed. With experience, recognizing the signs of a well-proofed loaf becomes intuitive.
An over-proofed loaf may exhibit a large hole at the top, with a dense, gummy texture at the bottom. To salvage an over-proofed loaf before baking, gently punch it down, knead, reshape, and allow it to rise again.
Conversely, an under-proofed loaf will lack visible bubbles and have a dense, gummy consistency throughout. Adjusting proofing time and technique based on environmental factors and dough characteristics ensures consistently excellent results in bread baking.
Proff it in a warm place. Some ovens have proofing options, and you can use that.
Baking Your Bread
Preheat your oven to 425°F/218°C, ensuring the Dutch oven is heated if using. Follow these steps for successful baking:
- Score the dough to control steam release and promote even rise, then carefully transfer it into the preheated Dutch oven using parchment paper or a silicone sling.
- Bake the bread for 45 minutes with the lid on to facilitate oven spring and crust development.
- After 45 minutes, remove the lid and continue baking for 25 to 40 minutes until the desired golden brown color is achieved.
- Once baked, carefully remove the bread from the oven and allow it to cool completely before slicing.
Troubleshooting Tips
- For additional guidance and resources on gluten-free sourdough baking, explore the provided links and reach out for support through online communities and forums dedicated to sourdough enthusiasts.
- Gummy interior: Ensure thorough baking, adjust water-to-flour ratio, avoid premature cutting, and handle the dough gently during baking.
- Adjusting sourness: Lengthen preferment fermentation for a tangier flavor or reduce starter quantity and proofing time for a milder taste.
- Too dense: Ensure you provide sufficient proofing time and allow your dough enough time to rise and ferment properly during the proofing stage. Excess moisture in the dough can lead to a dense and heavy texture. Ensure that you’re measuring your ingredients accurately. If your sourdough starter is not sufficiently active or if you’re using too little starter, it may need more carbon dioxide gas to leaven the dough.

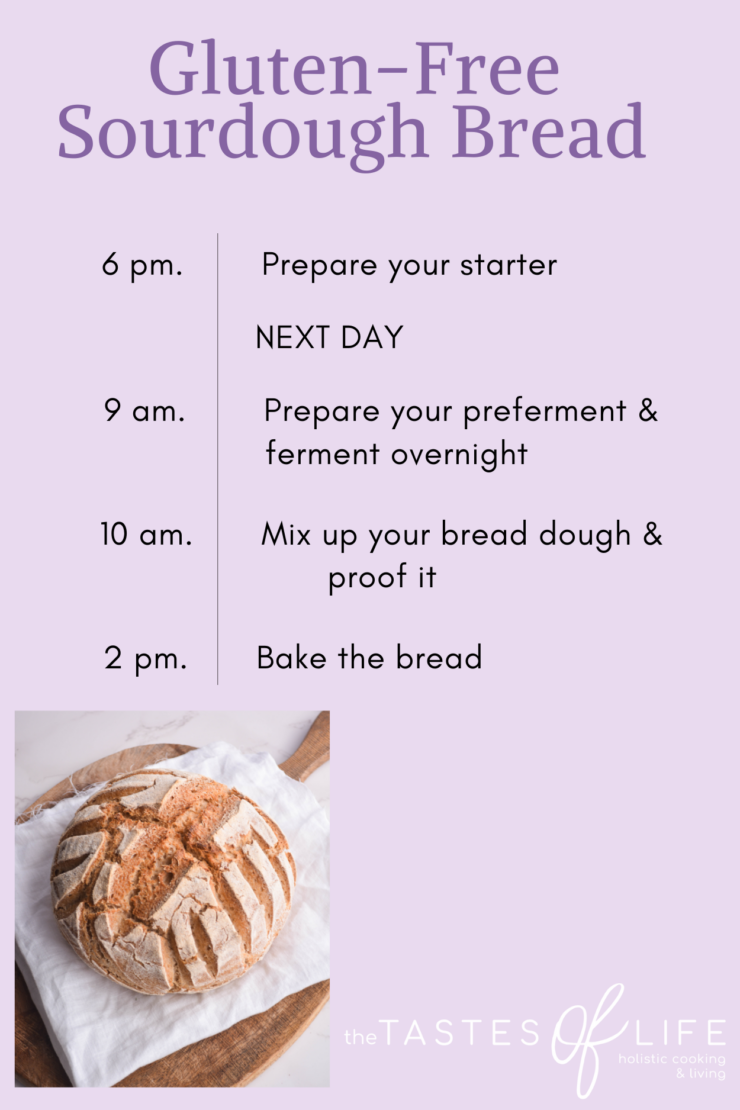
Schedule Example
6:00pm: Begin by feeding your starter a substantial amount to boost its activity.
9:00am: By now, your starter should be approaching or reaching its peak rise. Once it’s ready, prepare your preferment by mixing it up thoroughly. Cover the mixture and allow it to ferment overnight.
10:00am: It’s time to mix up your bread dough, then place the dough into your proofing basket or a lined bowl and let it rise for approximately four hours.
2:00pm: Preheat your oven, ensuring your Dutch oven is inside, 20 minutes before you’re ready to bake.
When your bread is fully proofed, Gently flip your proofed bread out onto a sheet of parchment paper. This makes it easier to transfer it into the hot Dutch oven. Score your bread as desired.
2:20 pm: Carefully remove the Dutch oven from the oven. Be cautious not to let out too much heat. Remove the lid and gently lower your bread into the hot Dutch oven, taking care not to deflate the bubbles you’ve worked hard to cultivate. Replace the lid, return it to the oven, and set your timer for 45 minutes.
3:05: After 45 minutes of baking, swiftly and carefully remove the lid, then promptly close the oven again.
Bake for an additional 25 to 45 minutes, depending on your oven. Aim for a golden brown hue before removing it from the oven.
Allow the bread to cool completely before cutting into it. This step requires patience, as cutting into it too early can release steam and result in a strange, gummy texture.
Use all your willpower to resist the temptation.
Feel free to adjust this schedule to suit your needs.

Loaf Shapes
When it comes to bread baking, there are several common shapes for loaves. Here are some of the most popular loaf shapes:
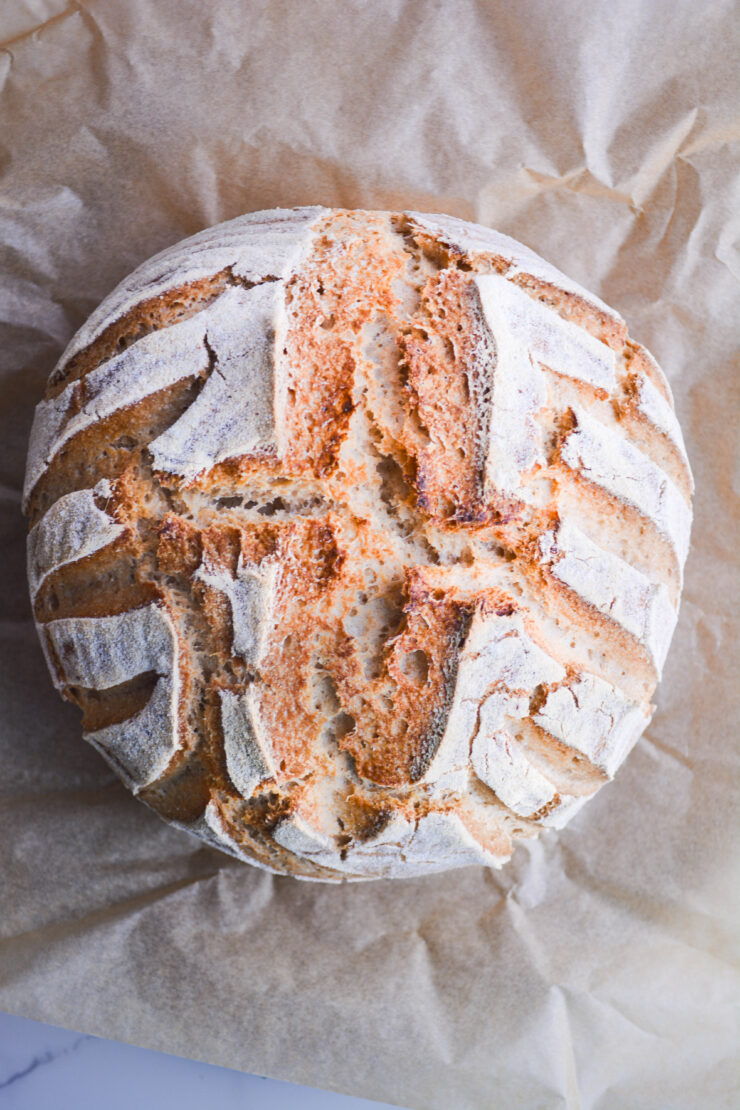
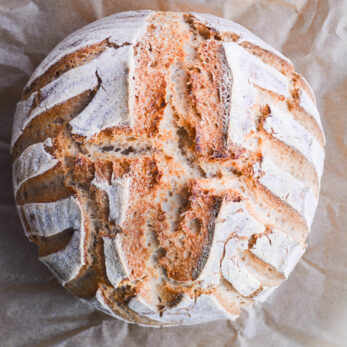
- Boule: A boule is a round or spherical loaf of bread. It’s a classic shape often associated with artisan-style bread, such as sourdough boules. Boules are baked free-form on a baking sheet or in a Dutch oven.
- Batard: A batard is an elongated oval-shaped loaf of bread. It’s similar in shape to a baguette but shorter and thicker. Batards are versatile and can be sliced into sandwiches or served as a meal accompaniment.
- Baguette: A baguette is a long, thin loaf of French bread with a crisp crust and soft interior. It’s characterized by its elongated shape, typically measuring about 2-3 inches in diameter and 2-3 inches in length. Baguettes are ideal for serving with soups, salads or as the base for sandwiches.
- Pullman Loaf: Also known as a sandwich loaf or pain de mie, a Pullman loaf is a rectangular-shaped loaf with straight, uniform sides. Pullman loaves are baked in a lidded pan called a Pullman pan, which results in a perfectly square-shaped loaf with a soft, tender crumb. They’re commonly used for sandwiches and toast.
- Ciabatta: Ciabatta is an Italian bread characterized by its flat, elongated shape and open crumb structure. Ciabatta loaves are free-form on a baking sheet. They are ideal for serving with olive oil, dipping, or making sandwiches.
- Focaccia: Focaccia is a flat, oven-baked Italian bread similar in style and texture to pizza dough. It’s typically rectangular or square and topped with olive oil and herbs. Focaccia can be served as an appetizer, side dish, or snack.
- Panettone: Panettone is a traditional Italian sweet bread typically enjoyed during the holiday season. It has a tall, cylindrical shape with a domed top and is often studded with dried fruit and nuts. Panettone is usually baked in special paper molds and makes a festive addition to holiday celebrations.
The shape of the loaf can vary depending on the type of bread, regional preferences, and individual creativity.
Now you can make your own gluten-free sourdough bread that you can enjoy for breakfast or lunch!
Important Note: Do not compare your gluten-free sourdough to a gluten-free sourdough.
The texture difference between gluten-free sourdough and traditional gluten sourdough can be pretty significant due to the absence of gluten in the former. Here’s a breakdown:
- Gluten-Free Sourdough:
- Texture: Without gluten, the texture tends to be denser, crumblier, and often more compact than traditional sourdough.
- Crumb Structure: Gluten-free sourdough typically lacks the characteristic chewiness and elasticity of gluten-containing bread. It may have a more uniform crumb structure without large air pockets.
- Moisture Retention: Gluten-free bread tends to dry out more quickly than its gluten-containing counterpart, so it might require more moisture in the recipe or careful storage to maintain freshness.
- Leavening: Achieving a good rise in gluten-free sourdough can be more challenging due to the absence of gluten, which provides structure and elasticity. As a result, gluten-free sourdough might not rise as much or have as open a crumb structure as traditional sourdough.
- Gluten Sourdough:
- Texture: Traditional sourdough made with gluten has a chewy, elastic texture and a complex crumb structure. It’s known for its airy interior and crispy, chewy crust.
- Crumb Structure: Gluten allows for the formation of gluten strands during fermentation, which creates the characteristic open crumb structure in sourdough bread.
- Moisture Retention: Gluten helps retain moisture in the bread, contributing to a softer crumb and longer shelf life than gluten-free bread.
- Leavening: Gluten provides the necessary structure for trapping gases produced during fermentation, allowing the dough to rise and develop the characteristic airy texture of sourdough bread.
The absence of gluten in gluten-free sourdough significantly impacts its texture, resulting in a denser, crumblier bread than traditional sourdough. While gluten-free sourdough may not have the same texture as traditional sourdough, it can still be delicious and satisfying in its own right, offering options for those with gluten sensitivities or celiac disease.
More Gluten-Free Recipes
Best Tigernut Flour Chocolate Chips, Pumpkin Muffins
Delicious Orange Cranberry Superfood Muffins
Gluten-Free Sourdough Bread
Ingredients
Preferment
- 200 g Active starter
- 125 g Water filtered
- 100 g Brown rice flour fine brown rice flour
Liquid
- 310 g Water
- 25 g Pslium husk
- 20 g Maple syrup or honey
- 10 g Olive oil
Dry ingredientces (flour mix)
- 130 g Brown rice flour Fine
- 90 g Oat flour
- 80 g Potato starch
- 60 g Arrowroot
- 50 g Sorgum flour
- 10 g Salt
Instructions
- Preferment Feed your starter generously, providing approximately 150g each of water and flour. This hearty feeding encourages vigorous activity, which is vital for successful breadmaking.If your starter has been refrigerated, conduct two feedings before commencing breadmaking. This ensures your starter is thoroughly revitalized and primed for baking.
- Start by mixing active starter, water, and flour in a bowl. Cover with plastic wrap and set it aside in a warm place. It can last 5- 20 hours, depending on how sour you want the bread to be. The longer you ferment it, the sourer the bread will be. Look for the preferred to be bubbly—you will know it is ready to mix.
- DoughBegin by mixing your psyllium husk, sweetener, and water to create a gel-like mixture. Set this aside to gel while you prepare the flour blend.In a large bowl or stand mixer, combine your selected flours and starches along with salt. This is also the stage to incorporate any dry seasonings or herbs for added flavor.Integrate the psyllium gel mixture into your active starter, olive oil if desired, and any other wet ingredients. Ensure thorough mixing to create a cohesive dough.Gradually add the wet ingredients to the flour mixture, using a spoon or dough hook to combine until a smooth dough forms.Transfer the dough onto a clean, smooth work surface and knead it into a smooth ball. Shape the dough as desired, ensuring proper sealing of seams for a tidy appearance.Place the shaped dough into a proofing basket or a bowl lined with a clean tea towel. Cover and allow the dough to proof for approximately three hours at room temperature or overnight in the refrigerator.
- Baking Your BreadPreheat your oven to 425°F/218°C, ensuring the Dutch oven is heated if using. Follow these steps for successful baking:Prehat the Dutch oven for 20 minutes.Score the dough to control steam release and promote even rise, then carefully transfer it into the preheated Dutch oven using parchment paper or a silicone sling.Bake the bread for 45 minutes with the lid on to facilitate oven spring and crust development.After 45 minutes, remove the lid and continue baking for 25 to 40 minutes until the desired golden brown color is achieved.Once baked, carefully remove the bread from the oven and allow it to cool completely before slicing.