How to Make the Burnt Cheesecake
Sharing is caring❤️

Traditional Burnt Cheesecake
This Burnt Cheesecake is a crustless cheesecake, creamy, smooth, and velvety. It will satisfy your sweet tooth and keep your belly happy! And it is the easiest cheesecake recipe you have ever made!
The burnt cheesecake has its roots deeply embedded in the culinary traditions of Spain. Hailing from the Basque Country- Basque region of Spain, this unconventional twist to the classic cheesecake originates back to the iconic La Viña Bar in San Sebastian. Legend has it that the burnt cheesecake resulted from a happy accident, where the chef, unable to control the oven’s temperature, ended up with a beautifully burnt top and caramelized crust exterior, concealing a velvety, custard-like creamy center. And it became a traditional cheesecake in Spain.
What sets the burnt cheesecake apart is its distinct appearance. Unlike its flawlessly smooth sibling, the burnt cheesecake embraces imperfection. The cracked, charred surface hides a world of flavors beneath, creating a visual and gustatory experience that challenges the conventional notions of what a cheesecake should be. The irregularities in its appearance only add to its allure, making it a dessert that celebrates the beauty in imperfection. So, do not worry about how your cheesecake looks! Trust me, it can come out differently every time you make it😂😂

Ingredients of Burnt Cheesecake
This burnt Basque cheesecake recipe magic lies in its simplicity. Its simple ingredients, such as cream cheese, sugar, eggs, and a touch of flour, combine to create a harmonious symphony of flavors. The absence of a crust allows the cheesecake to take center stage, letting the caramelized top and creamy interior steal the show. The genius lies in the balance of sweetness, richness, and subtle tanginess that defines a perfect burnt cheesecake.
The key components that contribute to the magic of this unconventional dessert:
Cream Cheese:
The rich and creamy cream cheese is at the heart of the burnt cheesecake. This luscious ingredient forms the base of the dessert, providing a velvety texture and a distinctive tanginess that characterizes classic cheesecakes.
Heavy Cream:
Contributes to the creaminess of the cheesecake.
Sugar:
The sweetness in the burnt cheesecake comes from sugar, which balances the tanginess of the cream cheese. It plays a crucial role in caramelizing the top layer during baking, adding a delightful crunch to the exterior while complementing the smooth interior.
Eggs:
Eggs contribute to the structure and texture of the burnt cheesecake. They help bind the ingredients together, creating a custard-like consistency. Additionally, eggs play a role in the leavening process, giving the dessert a light and airy quality.
Flour:
A small amount of flour is incorporated into the recipe, serving as a stabilizer. It contributes to the structure of the cheesecake, ensuring a perfect balance between a creamy interior and a slightly firmer exterior. For gluten-free, you can use gluten-free flour or arrowroot starch.
Vanilla Extract:
A touch of vanilla extract is often added to enhance the overall flavor profile. This aromatic ingredient imparts a warm and inviting fragrance, complementing the richness of the cream cheese.
Salt:
A pinch of salt is included to heighten the flavors and subtly contrast the sweetness. It acts as a flavor enhancer, ensuring that every bite of the burnt cheesecake is well-balanced.
Optional Flavorings:
While the classic burnt cheesecake relies on the simplicity of its core ingredients, some variations may include additional flavorings. Lemon zest, lemon juice, or citrus extracts can add a refreshing twist. In contrast, almond or coconut extracts can introduce unique nuances or add a coco powder for a cholate version. Fresh berries are also welcome.
The Baking Process
Preparing a burnt cheesecake is an art in itself. The key lies in the controlled chaos of baking. Unlike traditional cheesecakes, there’s no need for a water bath or meticulous temperature control. Instead, the oven’s high heat plays a pivotal role in creating the burnt exterior while maintaining the luscious creaminess within. The result is a dessert that defies expectations, with each slice revealing a captivating contrast of textures.
How to Make Burnt Cheesecake
1. Preheat the Oven:
Preheat your oven to 425°F (220°C). Ensure the rack is placed in the middle position. Prepare a 9-inch springform pan by lining it with parchment paper.
2. Cream Cheese Mixture:
In a large mixing bowl, beat the softened cream cheese with heavy whipping cream until it’s smooth and creamy. Use an electric mixer for this step. Make sure there are no lumps.
3. Sugar Addition:
Gradually add the sugar or sweetener to the cream cheese, continuing to beat until the mixture is well combined and fluffy. Scrape down the sides of the bowl to ensure even mixing.
4. Incorporate Eggs:
Add the eggs one at a time, beating well after each addition. This step ensures a smooth and consistent texture. Continue to scrape down the sides of the bowl as needed.
5. Add Vanilla Extract and Salt:
Pour in the vanilla extract and add a pinch of salt. Mix until the vanilla is fully incorporated. The salt enhances the overall flavor profile.
6. Fold in Flour:
Gently fold in the all-purpose flour using a spatula. Be cautious not to overmix; stop once the flour is just combined. This helps maintain the creamy texture. (OR IF YOU ARE USING A BLENDER, JUST PUT ALL THE INGREDIENTS INTO TEH BLENDER AND BLEND UNTIL SMOOTH)
7. Pour your Cheesecake Batter into a Springform Pan:
Transfer the batter into the prepared springform pan. Smooth the top with a spatula to create an even surface.
8. Bake to Perfection:
Place the springform pan in the preheated oven and bake at 425°F (220°C). Bake time is 45-50 minutes. The top should be deeply golden brown, and the center will still have a slight jiggle.
9. Cool and Refrigerate:
Allow the burnt cheesecake to cool in the pan on a cooling rack for about 1-2 hours. Once cooled to room temperature, refrigerate for at least 4 hours or overnight to let the flavors meld.
10. Serve and Enjoy:
Remove the cheesecake from the refrigerator, release it from the springform pan, and transfer it to a serving platter. Slice, serve, and savor the delectable flavors of your homemade burnt cheesecake.
Tips to Make This Creamy Cheesecake
- To experiment with flavors, consider adding lemon zest or other extracts to customize the taste.
- To achieve the characteristic burnt exterior, don’t be alarmed if the top cracks or browns deeply during baking; it’s part of the charm.
- Adjust baking time based on your oven. Keep an eye on the cheesecake in the last few minutes to prevent over-browning.
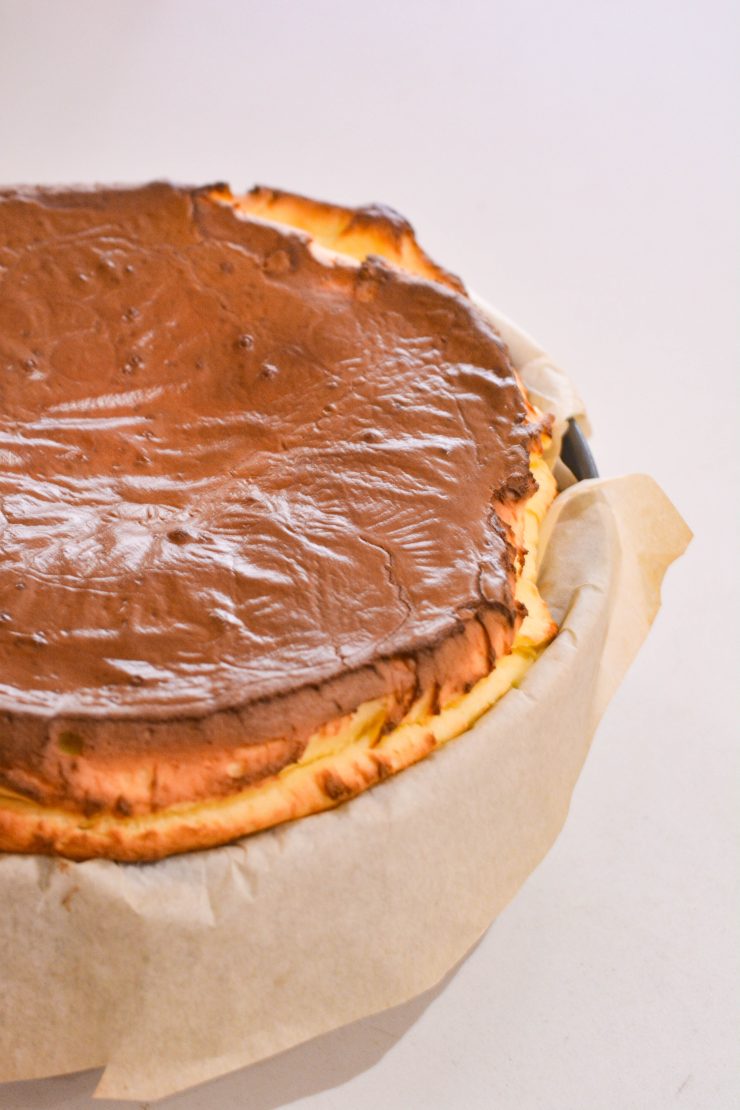
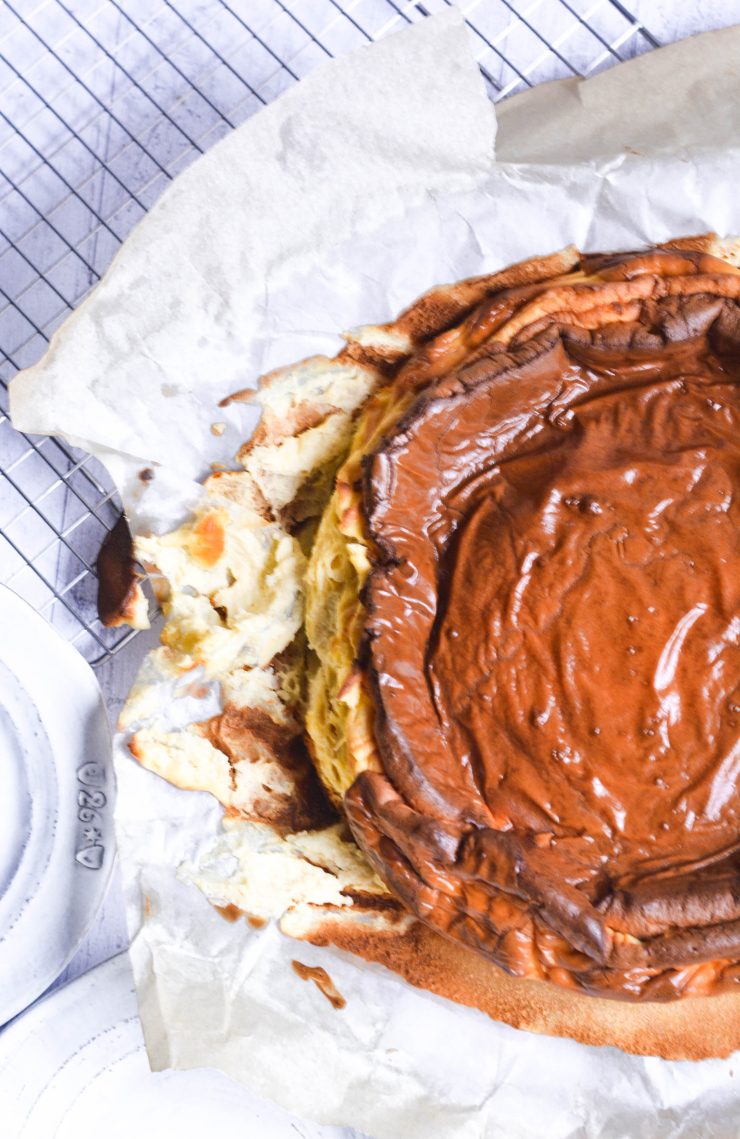
- Put fresh fruits on top of the cheesecake or squeeze some chocolate sauce.
Now, enjoy the fruits of your labor – a creamy, caramelized masterpiece that is the burnt cheesecake!
Flavor Explosion:
The first bite of a burnt cheesecake is a revelation. The crackly, caramelized top gives way to a velvety, custard-like filling that dances on the palate. The flavor profile is a delightful blend of sweetness and a subtle tanginess from the cream cheese. It’s a symphony of textures and tastes that elevate the burnt cheesecake to a league of its own. The contrast between the burnt exterior and the creamy interior creates an unparalleled sensory experience.
Rich Creaminess:
Oh, the unmistakable richness of cream cheese. The velvety texture of the cream cheese creates a luscious and indulgent mouthfeel, making each bite a luxurious experience.
Sweet Caramelization:
The exterior of the burnt cheesecake is distinguished by a caramelized top, achieved through the high heat of baking. This sweet and slightly crunchy layer contrasts the creamy interior, creating a textural masterpiece that plays on the taste buds.
Subtle Tanginess:
The inherent tanginess of cream cheese is a defining element of burnt cheesecake’s flavor. It provides a pleasant and balanced contrast to the sweetness, preventing the dessert from overly cloying. The interplay between sweet and tangy notes adds depth and complexity.
Vanilla Infusion:
Adding vanilla extract contributes a warm and aromatic undertone to the flavor profile. The subtle hints of vanilla enhance the sweetness, creating a comforting and familiar backdrop to the more pronounced cream cheese notes.
Custard-Like Consistency:
The presence of eggs in the recipe contributes to the custard-like consistency of the interior. This soft and smooth texture adds to the overall sensory experience, making each forkful a journey through layers of decadence.
Versatility in Presentation
While the burnt cheesecake’s charm lies in its rustic appearance, chefs and home bakers alike have embraced the opportunity to play with its presentation. From adding a drizzle of fruit coulis and fruit compote to decorating with edible flowers, the burnt cheesecake has become a canvas for culinary creativity. The freedom to experiment with toppings and accompaniments adds another layer to its allure, making it a dessert that adapts to various occasions.

Here’s a list of the equipment you’ll need:
Springform Pan:
A springform pan with a removable bottom is essential for efficiently removing the burnt cheesecake without damaging its delicate structure. The standard size is typically 9 inches in diameter.
Sheets of Parchment Paper:
Line the springform pan with parchment paper to prevent the cheesecake from sticking and to ease the removal process. This also helps in achieving a clean presentation.
Electric Hand Mixer (Stand or Handheld) or Blender:
A stand mixer or a handheld electric mixer is crucial for achieving a smooth and creamy consistency when blending cream cheese, sugar, eggs, and other ingredients.
Mixing Bowls
Rubber Spatula
Measuring Cups and Spoons
Oven
Baking Sheet
Wire rack (optional)
To cool down the cheesecake

How to Store Burnt Cheesecake
Room Temperature:
Burnt cheesecake is best enjoyed at room temperature. If you’ve just baked it, allow the cheesecake to cool on a cooling rack for 1-2 hours. After that, transfer it to the refrigerator. This gradual cooling helps the flavors meld and ensures a creamy texture.
Refrigeration:
Cool down the cheesecake and cover it securely with plastic wrap or aluminum foil. Refrigerate the cheesecake for optimal freshness. It’s recommended to consume refrigerated burnt cheesecake within 3-4 days.
Avoid Freezing:
Burnt cheesecake is best enjoyed fresh. Freezing can alter the texture and compromise the creamy consistency. If you must freeze leftovers, wrap individual slices tightly in plastic wrap and place them in an airtight container. Consume within a month for the best quality.
Protect from Odors:
Cheesecake can absorb odors from the refrigerator, affecting its taste. Store the burnt cheesecake in a dedicated section of the refrigerator away from strong-smelling foods. Additionally, you can also place a sheet of parchment paper between the cheesecake and other items to prevent any transfer of odors.
Room Temperature Before Serving:
Allow refrigerated burnt cheesecake slices to come to room temperature before serving to bring out the full flavor and creaminess. This can take about 30 minutes to an hour, depending on the ambient temperature.
Use an Airtight Container:
Consider placing individual slices in an airtight container if you’re storing individual slices. This provides an extra layer of protection against potential moisture absorption and helps maintain the dessert’s integrity.
Happy baking!😊
More Baking Recipies
Did you Make this Recipe?
Please let me know how it turned out for you! Leave a comment below and share a picture on Instagram with the hashtag #thetastesoflifeholisticblog
Yum