How to Save the Green in Green Vegetables

Learn how to save the green in green vegetables and why green vegetables lose their color, and how to keep soups, herbs, and spring greens bright and vibrant with simple cooking techniques.
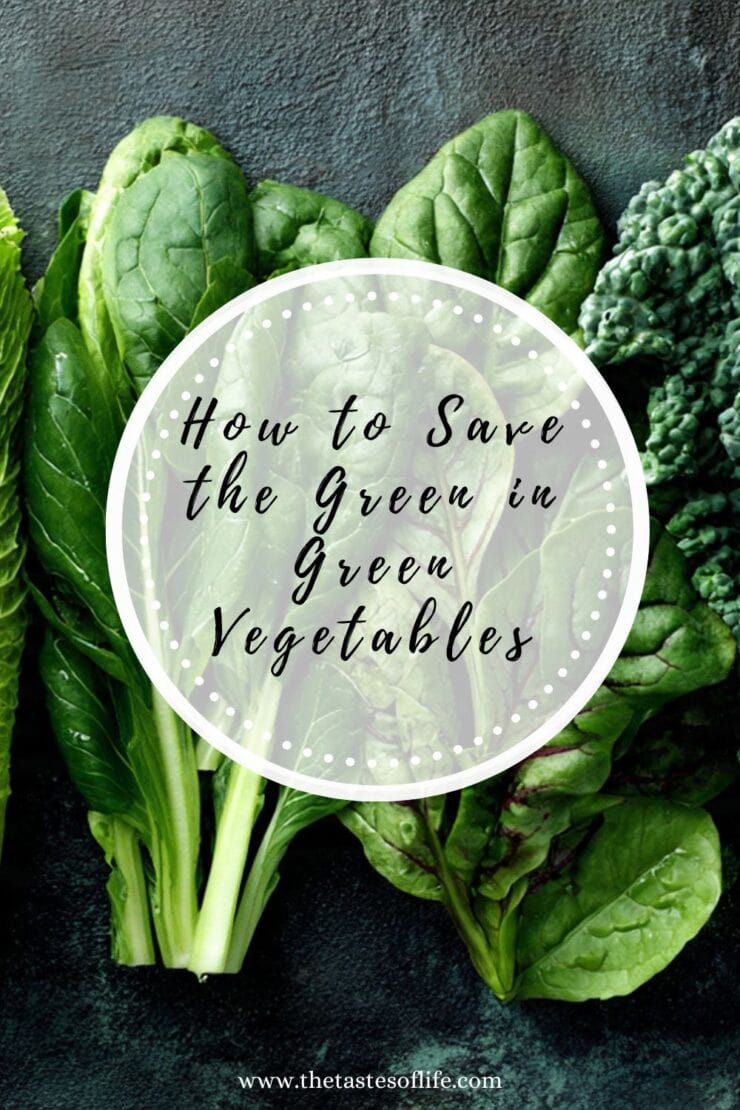
How to Save the Green in Green Vegetables
Spring is approaching, and people usually start craving greens, myself included. I love bright green soups and salads. Tiny green pearls of snap peas are scattered on a salad or a soup. I want to see deep green asparagus on my plate and the sharp, brilliant green of dandelion leaves, wild garlic, and tender young spinach. I can’t wait to stop eating heavy winter food and start eating lighter, detox a little bit. Spring and spring vegetables revitalize my body and my digestion.
Nothing feels more energizing than a bowl filled with vibrant greens or a bowl of fresh soup. It tastes alive. It looks alive.
And then… disaster strikes.
That once-luminous soup turns a murky gray-green or yellow, depending on the vegetable you are cooking with. The peas lose their sparkle, asparagus become yellowish, cooked herbs become dark, and you’re left staring into the bowl, wondering how something so beautiful went so wrong and why the soup looks so unappetizing. You look at the pictures on teh blog you got the recipe from, and nothing looks remotely similar. Well, food photographers have a lot of tricks up their slave to make food look good. Trust me on this one.
As a chef and nutrition consultant, I care deeply about two things when it comes to vegetables: nutrition and beauty. And when green vegetables lose their color, they usually lose both. The good news? Keeping greens green is not that difficult if you know what’s actually happening in the pan.
Let’s save the green.

Why Green Vegetables Lose Their Color
That bright green color comes from chlorophyll, which is sensitive to heat, acids, and overcooking. When green vegetables cook too long, or in the wrong conditions, the chlorophyll breaks down, revealing a dull olive tone underneath.
➡️ too much heat + too much time = sad greens
Timing, technique, and a few small tweaks is essential here and make all the difference.
The Golden Rule: Cook Fast or Not at All
Green vegetables love quick cooking. Long, slow cooking is great for fall or winter soups, stews, and braises, but not for broccoli.
Best methods for keeping greens vibrant:
- Blanching
- Steaming
- Sautéing quickly over medium-high heat
- Roasting at high heat (yes, roasting!)
Worst methods:
- Boiling forever
- Simmering
- Leaving them in hot water “just for a minute” (it’s never just a minute)
Blanching: The Secret Weapon
If I had to pick one technique every home cook should master, it’s blanching.
How it works:
- Drop vegetables into rapidly boiling, well-salted water
- Cook briefly (usually 30 seconds to 2 minutes)
- Immediately transfer to ice water
This technique will help lock in color, reserve nutrients, keep the texture crisp and make veggies taste fresher
Blanching is especially great for:
- Green beans
- Broccoli
- Asparagus
- Snow peas or snap peas
- Swiss chard
- Kale
Salt the Water Like You Mean It
Under-salting cooking water is one of the most common mistakes I see.
Well-salted water:
- Raises the boiling point slightly
- Enhances flavor from the inside out
- Helps greens stay vibrant
Don’t Add Acid Too Soon
Lemon juice, vinegar, and tomatoes are delicious, yes, but acid is chlorophyll’s enemy during cooking.
If you add acid too early:
- Greens turn dull
- Texture softens faster
The way hiow to do it properly is to add acidic ingredients after cooking, right before serving.
Finish with:
- Lemon zest or juice
- Balsamic drizzle
- Apple cider vinegar
- Pickled elements
Your greens stay bright and flavorful. Everyone wins.

Want to save this recipe?
Steam Smart (Not Forever)
Steaming gets a bad reputation because people overdo it.
The goal of seaming is to get:
- Bright color
- Tender-crisp texture
- Clean, fresh flavor
Tips for better steaming:
- Use high heat
- Keep the lid on
- Check early and often
- Remove immediately when bright green
Sautéing: Hot Pan, Short Time
A cold pan is the fastest way to wilt greens into oblivion.
For sautéed greens:
- Heat the pan first
- Add fat (olive oil, avocado oil, ghee)
- Add vegetables only when the pan is hot
- Keep them moving
Leafy greens like spinach and chard need seconds, not minutes. If they release water and start stewing, the heat is too low, or they’re overcrowded.
Roasting Can Keep Greens Green (Yes, Really)
Roasting works beautifully for:
- Broccoli
- Brussels sprouts
- Green beans
The trick:
- High heat (425°F / 220°C)
- Dry vegetables well
- Don’t overcrowd the pan
High heat evaporates moisture quickly, preventing that dull color while adding caramelized flavor. Just don’t roast them into submission.
Ice Baths Aren’t Just for Restaurants
An ice bath sounds fancy, but it’s just a bowl of ice and water, and it’s one of the easiest ways to level up your vegetables. It:
- Stops cooking instantly
- Preserves color
- Improves texture
You don’t need it for every meal, but for meal prep, entertaining, or make-ahead dishes, it’s a great way of preserving teh green color in vegetables.
Add Greens to Soups Last
Leafy greens and herbs don’t need to simmer. Ever.
Build your soup base first. Then add greens at the very end, even if you’re blending.
For vegetables like asparagus, peas, or broccoli, I like to cook them separately. I’ll blanch them quickly, then blend them with the hot soup base at the last moment. The result is a soup that’s vibrant, fresh-tasting, and actually has a spring green color.

Use Baking Soda (Very Carefully) in Purees
This is an old-school trick that works, but restraint is key.
A tiny pinch of baking soda creates an alkaline environment that helps preserve green color. Think knife-tip small for a large pot of water.
Too much baking soda makes your food taste soapy, and the vegetables break down too quickly. You’ll end up with bright green mush. Pretty, but not ideal.
I only use this trick when the final step is blending, like with green soups.
Bright Green = More Than Looks
Here’s the nutrition piece:
When vegetables keep their color, they usually retain more:
- Vitamin C
- Folate
- Antioxidants
Overcooked greens aren’t just less appealing, they’re often less nourishing.
As a nutrition consultant, I always say: your eyes are part of digestion. When food looks alive, your body responds better to it.
Green vegetables don’t need much cooking. They cook quickly, and they need to be seasoned properly. You will get a better texture, flavor, nutrition, and
When you do, they’ll reward you with that gorgeous green color that makes a plate feel fresh and alive.
Save the green, and your vegetables will finally taste as good as they look. 💚
Love My Content? Buy Me a Coffee!
Creating these resources for you is my passion, and I love hearing how they’ve helped you on your health journey. If you appreciate my content and want to support my work, you can buy me a coffee to help fuel more tips, recipes, and inspiration. Every little bit means the world to me!