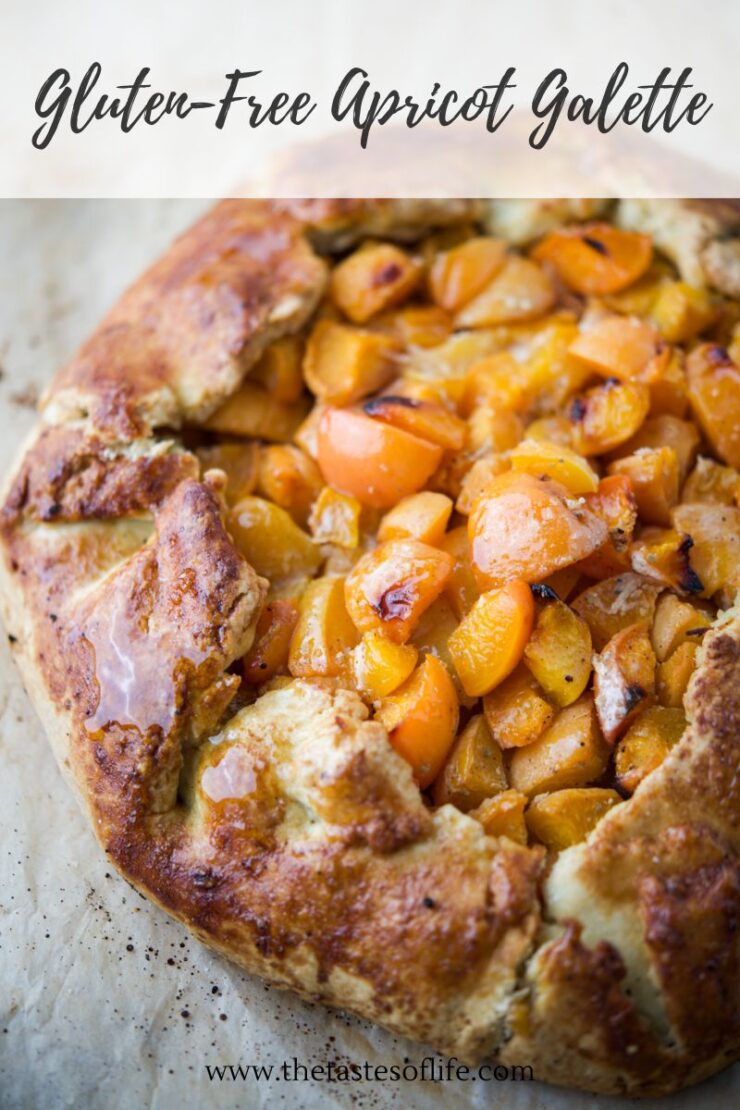
Gluten-Free Apricot Galette

This gluten-free apricot galette is a rustic French tart with a buttery, flaky crust and juicy apricots. A beginner-friendly gluten-free dessert perfect for apricot season, farmers’ market finds, and summer gatherings.
Gluten-Free Apricot Galette
The summer is in full swing, and apricots are abundant at the farmers’ market. When I saw them on Saturday, I knew immediately what I was making.
Not jam.
Not pie.
But my favorite rustic summer dessert is gluten-free apricot galette.
As a nutrition consultant and chef, I’m always looking for recipes that are delicious but easy and dont require hours in the kitchen. And this galette checks every box. It’s beautiful, simple, forgiving, and tastes like something you’d be served at a charming French countryside café.
What I love most is that a galette doesn’t ask you to be perfect. There is no crimping, no lattice work, no stressing over whether your pie edges look Instagram-worthy. You simply roll out the dough, pile on the fruit, fold the edges over, and bake.
That’s my kind of baking.
Growing up in Poland, we looked forward to apricot season every year. We called apricots morele, and when they appeared in the markets, you knew summer had fully arrived. Their sweet fragrance filled kitchens and baskets, and somehow everything felt a little brighter.
These days, when I bring home a bag of apricots from the farmers’ market, I’m instantly transported back to those Polish summers.
And if I’m being honest, I actually prefer an apricot galette over a traditional pie.
I know that’s a bold statement.
But after testing this recipe several times, I’ve found that apricots truly shine in a galette. The fruit gets lightly caramelized around the edges while still holding its shape. In a pie, I think some of that beautiful texture gets lost.
The other reason? The buttery, flaky crust.
Gluten-free baking can sometimes feel intimidating. I’ve tasted plenty of gluten-free crusts that were dry, crumbly, or simply disappointing. This one isn’t. The secret is to keep the butter cold and resist the urge to overwork the dough. Every time I make this recipe, I’m reminded that gluten-free baking doesn’t have to be complicated.
In fact, I think this is one of the most beginner-friendly gluten-free baking recipes you can make. The rustic nature of a galette means imperfections actually make it prettier. And trust me, your guests will think you spent far more time on it than you did.
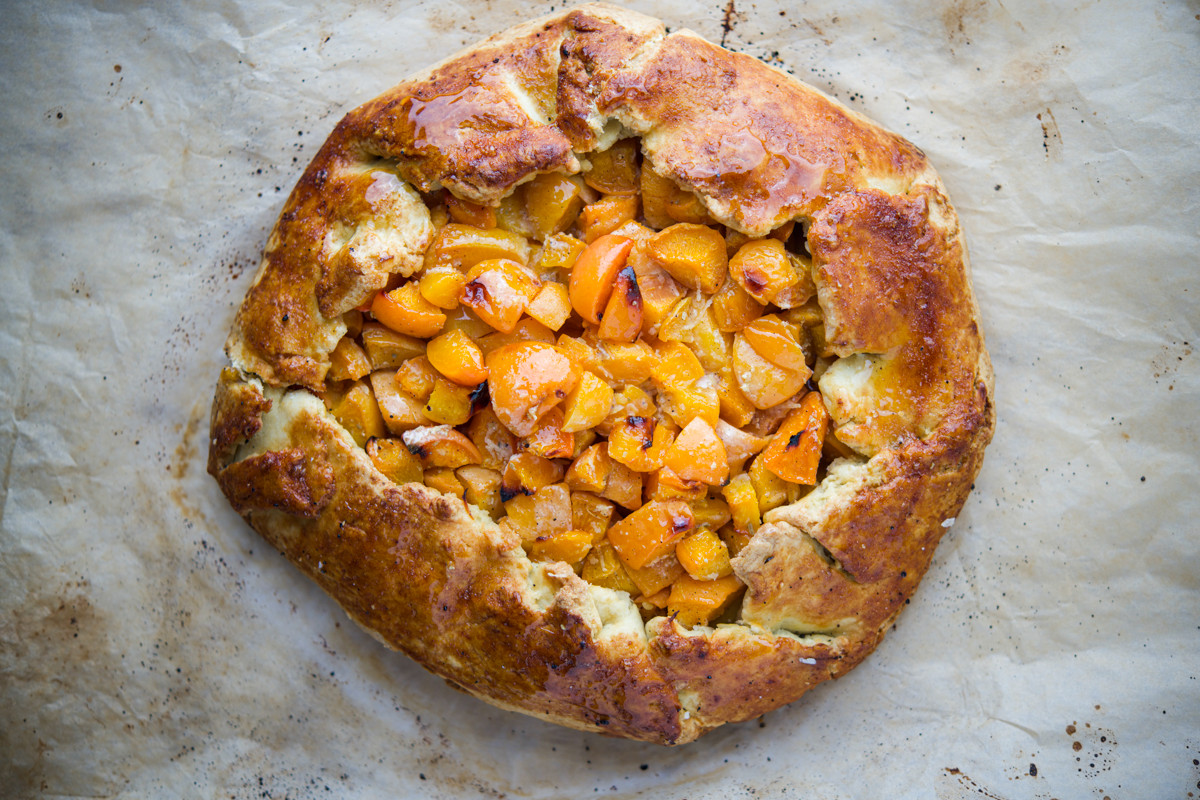
When this galette comes out of the oven, the apricots become soft and jammy, the apricot jelly creates a gorgeous glossy finish, and the crust turns golden and crisp. The aroma alone is enough to make everyone wander into the kitchen asking, “When can we eat it?”
Usually, before it’s even cooled.
And honestly? I don’t blame them.
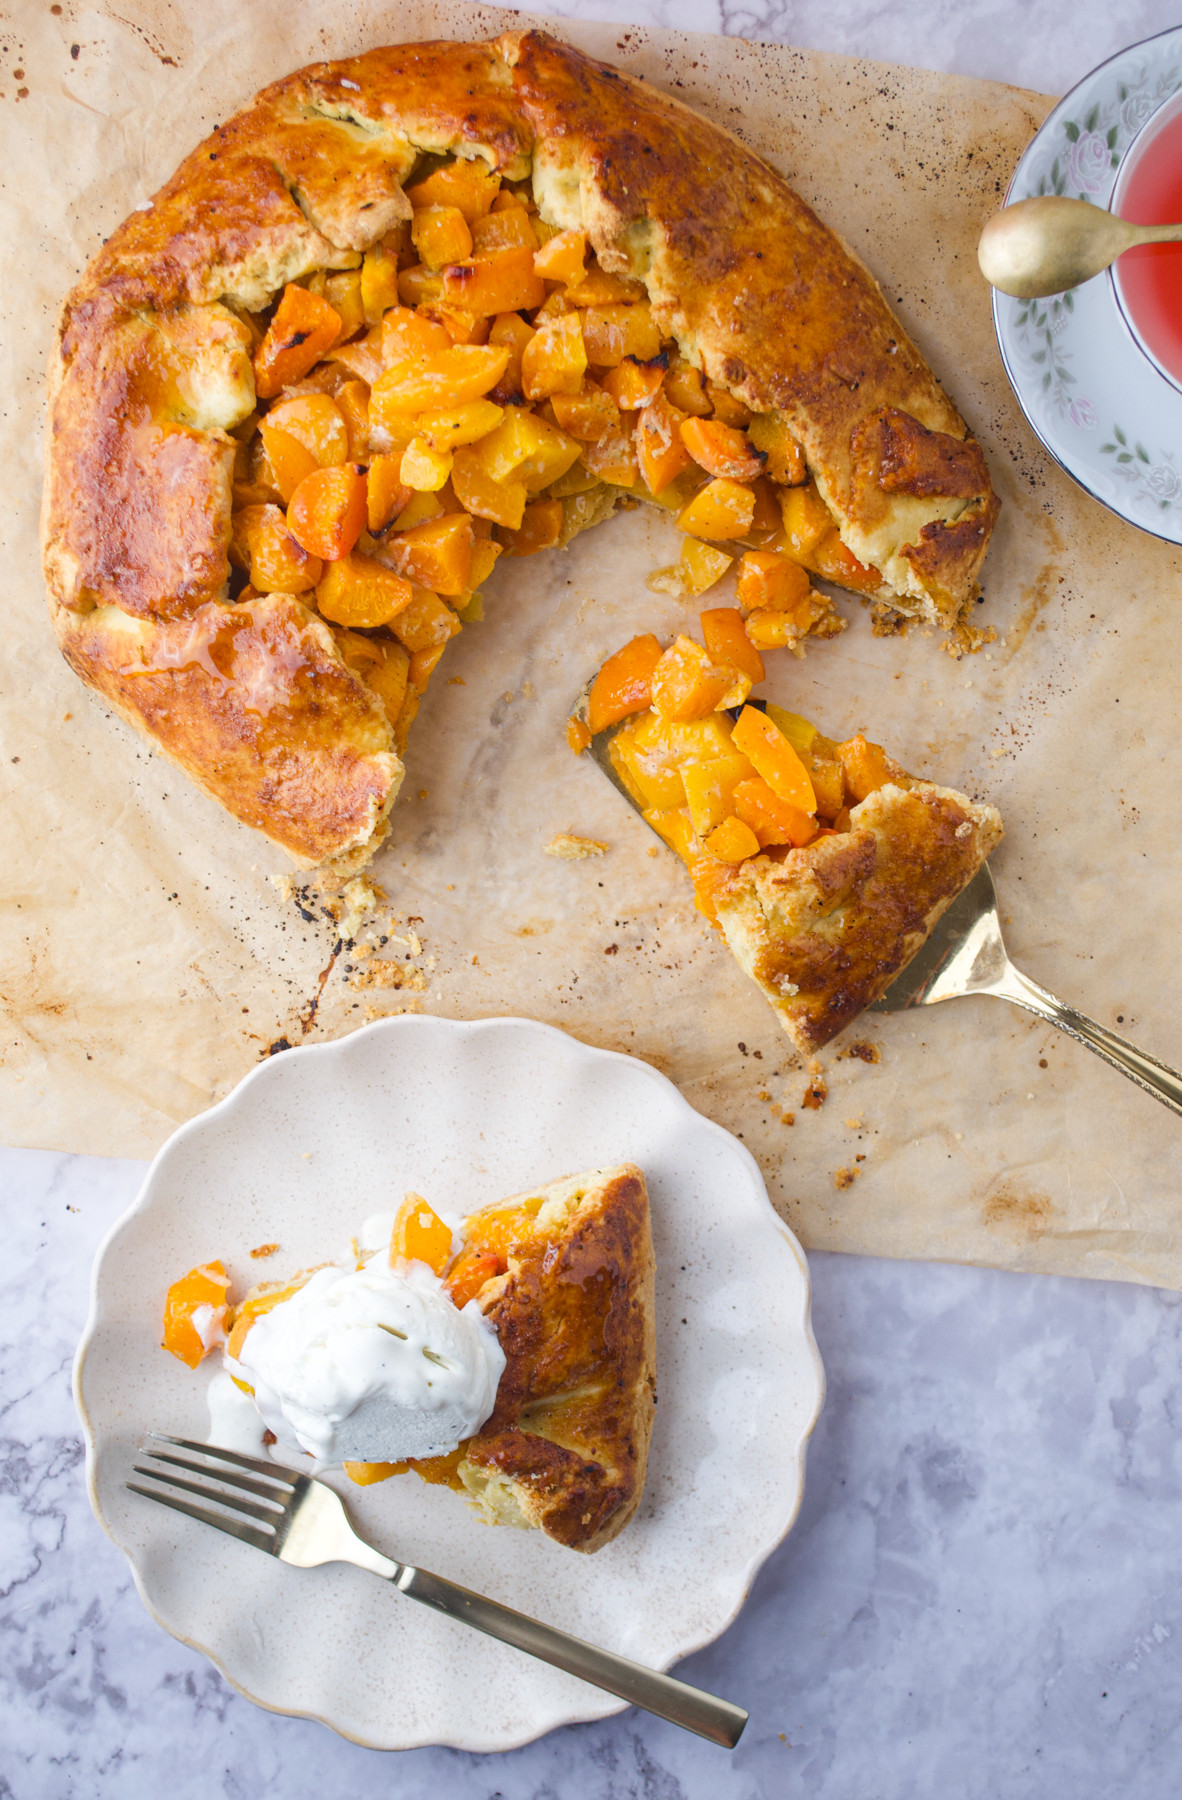
This is one of those summer desserts that will satisfy everyone, especially served with a scoop of vanilla ice cream. You cab also try my peach galtte or Savory Pear Galtte.
Want to save this recipe?
Why I Love This Recipe
- It celebrates apricot season beautifully.
- The rustic French tart style means it doesn’t need to look perfect.
- The buttery, flaky crust tastes incredible.
- It’s beginner-friendly, especially for gluten-free baking.
- It works equally well for brunch, dessert, or afternoon coffee.
Ingredients for Gluten-Free Apricot Galette
This website may contain affiliate links, which means I may earn a small commission at no extra cost to you if you purchase through these links. As an affiliate, I only recommend products or services I genuinely use and love. Check the affiliate disclosure here.
Did you know?
As a chef, I’ve noticed that people often overlook apricots in favor of peaches or nectarines. But I would argue that apricots have the most interesting flavor of all three. They’re sweet, slightly tart, floral, and almost honey-like when fully ripe. Once baked, they become soft and jammy while still maintaining a bright, fresh flavor.
How to Make Gluten-Free Apricot Galette
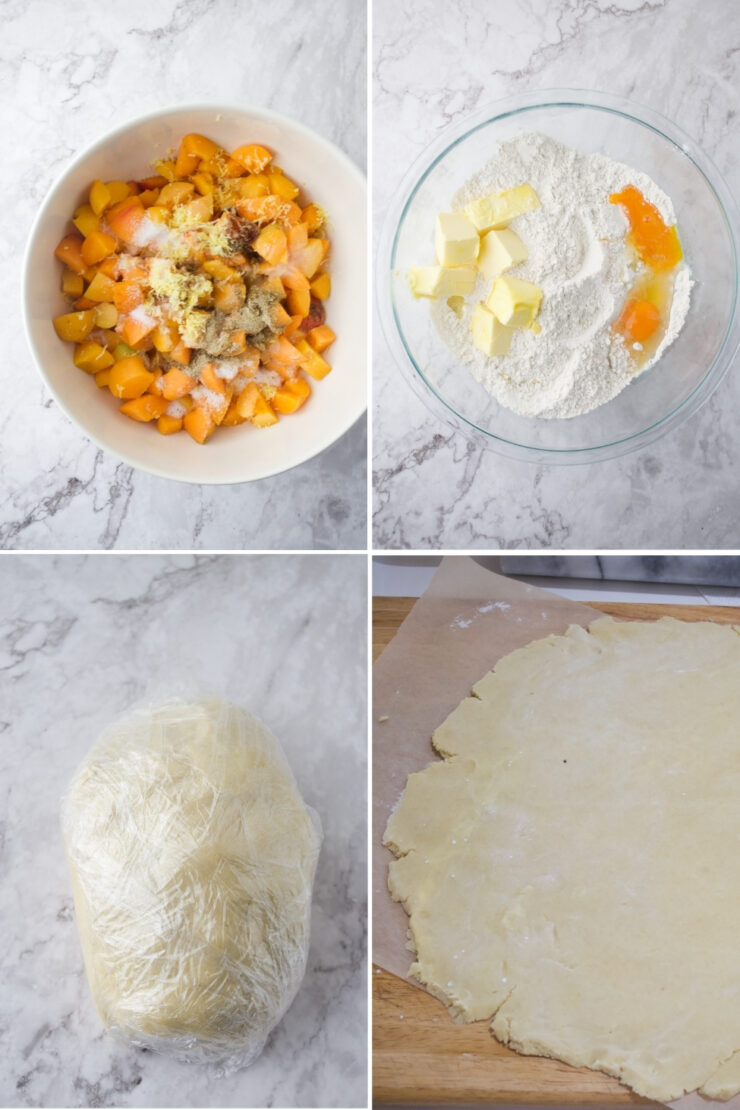
- Combine the gluten-free flour, allulose (or coconut sugar) and a pinch of salt in a large mixing bowl. Using a pastry cutter, cut in the cold butter until the mixture looks like coarse crumbs. Add iced water, which is drizzled into the center of the flour. Use a rubber spatula to gently bring the dough together without overworking it. Once it forms, I wrap the pastry dough in cling wrap (or plastic wrap, or you can just put it in ga silicone freezer bag) and refrigerate for an hour. While the chilled galette dough rests, prepare the fruit filling by tossing sliced or diced apricots with nutmeg, cardamom, and lemon juice in a medium bowl.
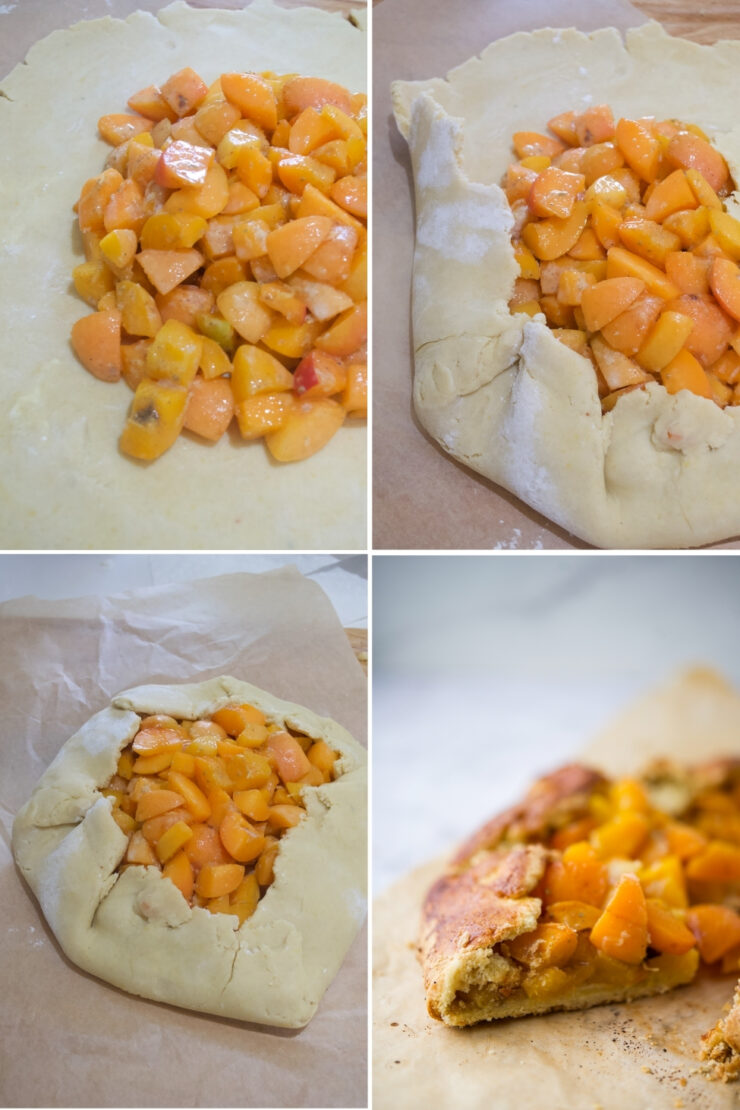
- Place a large piece of parchment paper on the work surface. The dough is rolled into a rustic circle on parchment paper with a rolling pin. If you need more flour to keep teh dough from sticking, you can sprinkle some before rolling. Spread the apricot jelly if you are using it, and arrange the apples in a circle in the center, leaving enough room to fold the edges of the crust over.
- The edges of the crust are folded toward the center, overlapping slightly. A quick brush of egg wash (Egg wash is a simple mixture of beaten egg (sometimes thinned with a little water or milk) brushed over pastry dough before baking to give it a glossy, golden brown finish) over the edge of the crust helps it brown beautifully.
- Bake it on a baking sheet at 375°F for 45 minutes, until the apricots are tender and the crust is golden brown.
Ingredient Substitutions
- Apricots – Peaches, nectarines, plums, or cherries work beautifully.
- Gluten-free flour – Use your favorite cup-for-cup gluten-free flour blend.
- Butter – Substitute with a quality dairy-free butter if needed.
- Nutmeg – Try cinnamon, cardamom, or ginger for a different flavor profile.
- Apricot jelly – Peach preserves or orange marmalade, make excellent alternatives.
Chef Angie’s Tips
After making this galette over and over again (and eating plenty of “test slices” along the way), I’ve learned a few tricks that make all the difference.
- Roll the dough between two sheets of parchment paper. Gluten-free dough tends to be more delicate and can stick to the counter easily. Rolling it between parchment paper makes the process much easier and helps prevent cracks and frustration.
- Don’t let the dough become too soft. The secret to a beautifully flaky, buttery crust is keeping the butter cold. If the dough starts to feel sticky or difficult to handle, pop it in the refrigerator for 10–15 minutes before continuing. A chilled dough will yield a much better texture after baking.
- Let the apricots rest with the sugar and spices for about 15 minutes before assembling the galette. This simple step allows the fruit to release some of its juices while soaking up the flavors of the spices. I find it creates a deeper apricot flavor and a lusher filling.
- Don’t skip the egg wash. It may seem like a small detail, but it’s one of my favorite finishing touches. A quick brush of egg wash transforms the crust from pale to a beautifully golden hue, giving it that bakery-worthy glow. As it bakes, the edges become shiny, crisp, and irresistibly inviting.
- Let the galette cool slightly before slicing. I know it’s tempting to dive right in (trust me, I’ve been there), but giving it 15–20 minutes lets the juices settle and results in cleaner slices.
Ways To Serve
- Warm with a scoop of vanilla ice cream.
- Alongside freshly whipped cream.
- With a dollop of Greek yogurt for brunch.
- Paired with lattes on a summer morning.
- Served after dinner with herbal tea.
- With refreshing lemonades.
Storage
Store covered at room temperature for up to 1 day. Refrigerate in an airtight container for up to 4 days. Reheat briefly in the oven to crisp up the crust. Avoid microwaving if possible, as it can soften the flaky crust. Freeze slices for up to 2 months and thaw overnight in the refrigerator.
If you’ve been nervous about gluten-free baking, let this galette be your starting point.
It’s forgiving.
It’s beautiful.
And it’s proof that a gluten-free dessert can be every bit as delicious as its traditional counterpart. One bite of those sweet-tart apricots wrapped in a buttery, flaky crust and you’ll understand exactly why. Happy baking.
Gluten-Free Apricot Galette
Equipment
Ingredients
Dough
- 1 1/2 cup Gluten free flour with xanthan gum
- 2 tbsp Allulose or coconut sugar
- 1/4 tsp Salt
- 8 oz Butter
- 1/4 cup Water iced
Instructions
- Make the galette dough: In a large mixing bowl, combine your gluten-free flour, cold butter (cut into small pieces), a pinch of kosher salt, and optional xanthan gum if your blend doesn’t have it. Mix the butter into flour. Add ice water a tablespoon at a time until the dough forms. Gather the pie dough into a ball by gently pressing and folding it against the sides of the bowl. It’s okay if it looks a little rough or “shaggy” right now, some cracks and uneven bits are totally normal. Avoid overhandling it, though, too much kneading can warm the butter, which means less of that coveted flaky crust later on. Press into a disc, wrap in plastic wrap, and chill from 30 minutes to an hour.2. Make the apricot filling: In a medium bowl, toss sliced peaches with lemon juice, arrowroot starch, nutmeg, cardamom, and sweetener. Let sit so the peach juices start flowing.3. Assemble: Roll the dough on a floured surface lined with parchment paper (so you can easily transfer to the baking sheet) into a rough, perfect circle or a rectangular shape, about ¼ inch (about 5-6mm) thin. Spoon apricot jelly (optional if you are using it) and lay the apricot filling into the center of the dough, leaving a 2-inch border. First fold: Take one third of the dough and fold it toward the center, then fold the opposite third over it: just like folding a letter. Rotate the dough 90 degrees so the open ends are facing you and away from you. Roll it out again into a long rectangle.Second fold: Repeat the same letter-style fold: one third in, then the other third over the top.4. Brush the crust with egg wash or plant milk and sprinkle with turbinado sugar or coconut sugar if desired.5. Bake until golden brown and bubbling, around 40-45 minutes at 375 F. 6. Cool before slicing.
Nutrition
Love My Content? Buy Me a Coffee!
Creating these resources for you is my passion, and I love hearing how they’ve helped you on your health journey. If you appreciate my content and want to support my work, you can buy me a coffee to help fuel more tips, recipes, and inspiration. Every little bit means the world to me!