Healthier Chicken Kiev Recipe
Discover the delicious and comforting flavors of a healthier Chicken Kiev Recipe a classic dish from Eastern Europe. Learn how to make this simple yet indulgent recipe. Perfect for any meal, impress your family and friends with this timeless favorite!

Easy Keto Chicken Kiev
Chicken Kiev is a dish I often like to prepare with longing for home. My family used to make it quite frequently. Growing up in Poland, Chicken Kiev was a staple at family gatherings and special occasions. Traditionally rich and indulgent, I reimagined this dish in a healthier version that doesn’t compromise on flavor or nostalgia. Classic Chicken Kiev hails from Eastern Europe, specifically Russia, Ukraine, and Poland. Chicken breast is pounded out, stuffed with a garlic herb compound butter, coated with eggs and breadcrumbs, and eventually fried and/or baked. The best part of this chicken truly is the filling.
What Is Chicken Kiev?
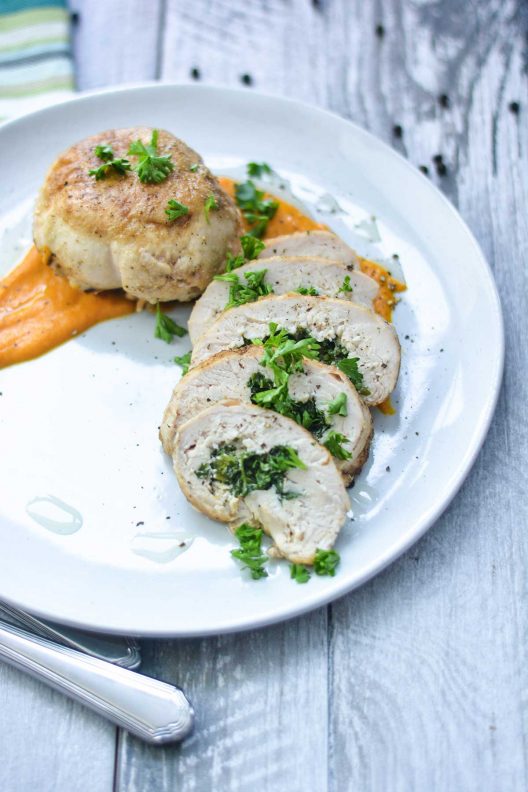
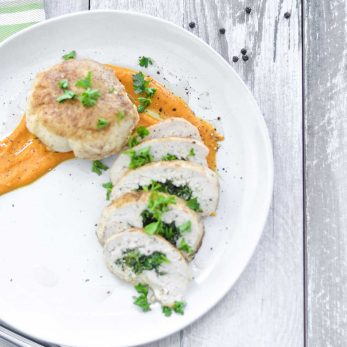
Chicken Kiev consists of a tender chicken breast stuffed with a flavorful mixture of butter, garlic, and herbs, breaded, then fried until crispy and golden brown.
The origins of Chicken Kiev are somewhat disputed, with both Russian and Ukrainian people claiming to have created the dish. However, what can be agreed upon is that this dish is a true crowd-pleaser, with its rich and satisfying flavors making it a favorite at dinner parties and family gatherings.
When you cut into a Chicken Kiev, the melted butter and garlic mixture oozes out, creating a delicious and satisfying sauce to accompany the tender chicken. This dish is often served with mashed potatoes or roasted vegetables to complete the meal.
This is my healthier version of Chicken Kiev. My family’s original recipe included breadcrumbs, but I did not deep fry it. Instead, I pan-fried it and used cassava flour and walnuts for breading.
Chicken Kiev In Poland
In Poland, we believe the more butter, the merrier. So growing up there as a child meant Chicken Kiev was a frequent, and highly popular dinner guest with its rich buttery taste. But the Chicken Kiev I grew up with is not the one you find in the grocery stores. Hailing originally from Russia, Chicken Kiev is chicken covered with cold herb-infused butter (usually parsley, but you can use dill), then rolled, breaded, and baked. Sometimes it can be roasted or deep-fried. Some people like to make a white sauce to accompany it. The dish was extremely popular in the 1970s and then fell out of popular favor in the late 80s as cuisine and tastes changed. It has staged a comeback however because no matter how you cook or dress it, Chicken Kiev is a simple and elegant meal for yourself or guests.
It’s also shrouded in mystery and controversy, from what the filling should be to how to what kind of chicken meat to use. Historically, Chicken Kiev was known as “chop devolaj” or chicken cutlet stuffed with butter and herbs in Eastern Europe. However, it has also been known as “chop de volaille”, ‘volaille’ meaning poultry in French. If you were to order a “côtelette de volaille” in a French bistro, you would receive minced poultry meat (volaille can be a chicken, duck or any fowl) shaped into a cutlet with a filling on the inside. In Russian “de-voliay cutlet” means something similar – a cutlet of stuffed poultry meat. So it’s possible that “chop de volaille” was invented by a French chef at a Russian court.
But what’s inside the chicken? Originally in Eastern Europe, the cutlet was stuffed with butter. In the West, people have used garlic butter. Adding herbs such as parsley and dill is optional and seems to depend on where you live. In some American recipes, butter is replaced by blue cheese (!), and in others, you can find bacon, or ham and cheese combinations. At this point, I would argue that we are no longer in Chicken Kiev territory. Indeed, if you are wondering where the “Kiev” part comes from, Kiev is, of course, the capital of Ukraine, and it is believed that the dish became Chicken Kiev for restaurant marketing reasons in the US. Apparently, there were concerns on both sides of the Atlantic that keeping the dish’s French name would lessen its appeal to Eastern European diners. Who would have guessed the always welcomed dish at my Polish dinner table would face such a journey through time to yours?

Ingredients for a Healthier Chicken Kiev
We’ve made a few substitutions and additions to create a healthier version of Chicken Kiev. Here’s what you’ll need:
- Butter- Unsalted: Provides richness and a creamy texture to the herb filling
- Parsley: Fresh parsley adds a vibrant, herbaceous flavor to the butter mixture.
- Garlic: Minced garlic is essential for its robust, savory flavor. It infuses the herb butter with a pungent, aromatic quality that complements the other herbs and the chicken.
- Chives: Fresh, finely chopped chives.
- Chicken Breast: Boneless, skinless chicken breasts.
- Eggs: Beaten.
- Cassava Flour (almond flour), ground walnuts (or almonds), or Gluten-Free Bread Crumbs: These alternatives to traditional breadcrumbs make the dish gluten-free while providing a crispy, golden coating. Cassava flour is derived from the yucca root. It is a popular gluten-free substitute, while gluten-free breadcrumbs offer a similar texture to regular breadcrumbs without gluten. CASSAVA FLOUR. Grain, gluten, and nut-free, this flour comes from the root of the Cassava plant, native to South America and some parts of Asia and Africa, and resembles the taro, yam, and potato. It’s high in carbohydrates, and of all the non-gluten flours available, is the most like wheat flour in how it behaves. It’s soft, powdery, and does not have a distinctive taste. As a result, it’s a great substitute if you have dietary restrictions.

Preparing the Herb Butter
- Soften the Butter: Let it sit at room temperature until it’s soft enough to mix easily.
- Mix the Herbs and Garlic: In a mixing bowl, combine the softened butter with the chopped parsley, salt, black pepper, minced garlic, and chopped chives. Mix until the herbs, salt, pepper, and garlic are evenly distributed throughout the butter.
- Shape the Butter: Place the herbed butter on a piece of plastic wrap, shape it into a log, and wrap it tightly. Refrigerate the butter log until it’s firm, about 30 minutes.
Preparing the Chicken
- Flatten the Chicken Breasts: Place each chicken breast between two sheets of plastic wrap and pound it with a meat mallet until it’s about 1/4 inch thick. This helps the chicken cook evenly and makes it easier to roll.
- Add the Herb Butter: Cut the chilled butter log into four equal pieces. Place a piece of herb butter in the center of each flattened chicken breast.
- Roll the Chicken: Carefully roll each breast around the butter, tucking in the sides to create a neat, sealed package. Secure with toothpicks if necessary, or place one chicken breast on the piece of plastic wrap (it has to be 50 % bigger than the chicken breast because you will be wrapping it in the wrap) and place a piece of butter in the middle. Place it on the palm of your hand and wrap the plastic wrap around the chicken breast to seal it. Then transfer it to the freezer for 45 minutes. This seals the chciekn breast so the butter will stay in it.
Breading the Chicken
- Prepare the Coating: Place the beaten egg in a small bowl and the cassava flour or gluten-free breadcrumbs in another.
- Coat the Chicken: Dip each chicken roll in the beaten eggs, then roll it in the cassava flour, ground walnuts or gluten-free breadcrumbs until it’s fully coated.
Cooking the Chicken Kiev
- Preheat the Oven: Preheat your oven to 375°F (190°C).
- Pan-Fry to Golden: Heat some olive or avocado oil in a large oven-safe skillet over medium heat. Add the chicken rolls and cook until golden brown on all sides, about 2-3 minutes per side for the crisp exterior.
- Bake to Crispy Perfection: Transfer the skillet to the preheated oven and bake for 20-25 minutes, or until the chicken is cooked through. The internal temperature reaches 165°F (74°C).
Want to save this recipe?

Serving and Enjoying
Once your Chicken Kiev is cooked, remove it from the oven and let it rest for a few minutes before slicing. Serve with a side of steamed vegetables or a fresh salad to keep the meal light and nutritious.
What to Serve With Chicken Kiev
- Mashed Potatoes: Creamy mashed potatoes perfectly match, providing a smooth, buttery counterpart to the crispy Chicken Kiev.
- Steamed Vegetables: Lightly steamed vegetables such as green beans, carrots, or broccoli add color and freshness to the plate.
- Rice Pilaf: A simple rice pilaf with a touch of herbs and spices can be an excellent accompaniment, soaking up any extra garlic butter.
- Garden Salad: A fresh garden salad with mixed greens, tomatoes, cucumbers, and a light vinaigrette can help balance the richness of the Chicken Kiev.
- Roasted Vegetables: Roasting vegetables with olive oil, salt, and pepper adds a nice crunch and flavor that pairs well with the dish.
- Zucchini Noodles: For a low-carb option, consider serving zucchini noodles tossed with a light lemon and herb dressing.
- Creamed Spinach: Rich and creamy spinach can complement the herb butter inside the Chicken Kiev, adding depth to the meal.
- Coleslaw: A tangy coleslaw with a vinegar-based dressing can cut through the richness and add a refreshing crunch.
- Baked Sweet Potatoes: Sweet potatoes add a natural sweetness that pairs nicely with the savory chicken.
- Couscous Salad: A light couscous salad with fresh herbs, lemon juice, and a touch of olive oil can be a delightful and easy side dish.
Storage
Any leftover Chicken Kiev can be stored in an airtight container in the refrigerator for up to 3 days. To reheat, place the chicken in a preheated oven at 350°F (175°C) until warmed, about 15-20 minutes. Avoid microwaving to maintain the crispy exterior.
Chicken Kyiv is a timeless and delectable dish that brings rich Eastern European flavors to your table. With its savory garlic butter filling and crispy golden exterior, it’s sure to impress and satisfy. Easy to prepare and perfect for any occasion, this classic recipe is a must-try for any home cook. Enjoy the delightful combination of textures and flavors in every bite!
___________
Did you make this recipe?
Please let me know how it turned out for you! Leave a comment below and share a picture on Instagram with the hashtag #thetastesoflifeholisticblog
More Chicken Recipes
Creamy Tuscan Italian Chicken Recipe
Moroccan Preserved Lemons Chicken Tagine
How To Make Honey Glazed Chicken With Golden Beet Salsa
French Chicken Chasseur (Hunter’s Chicken Stew) Recipe
Baked Chicken With Creamy Cashew Sauce
Chicken Sage Breakfast Patties
Healthier Chicken Kiev Recipe
Ingredients
- 1/2 cup softened butter
- 2 tbsp chopped parsley, divided
- 1 garlic, minced
- 2 tsp chives
- 4 large chicken breasts
- 2 whole eggs, lightly beaten
- 1 tbsp water
- 3/4 cup cassava flour or gluten-free breadcrumbs
- 1 tsp salt
- 1 tsp pepper
Instructions
- In a bowl, combine soften butter, chopped parsley, salt, pepper and garlic. Place mixture in plastic wrap and roll into a 4 inch log. Place in the refrigerator for at least an hour.
- Preheat oven to 350. Spray a 9×13 inch pan with non stick spray and set aside.
- Place chicken breasts between two sheets of plastic wrap. Pound chicken until they are thin, about 1/2 to 3/4 inch thick.
- Slice the herbed butter.
- Place a slice of herbed butter and chives in the middle of your chicken breast. Place chikcken breast on precut plastic wrap (make sure that is big enough that you can wrap the chicken breast and) and twist the wrap around the chicken breast.
- Put the wrapped chicken breast in the frezzer for an hour. Take the chicken out and mix the flour in a shallow bowl and roll the chicken breast in flour.
- Place the chicken in a baking dish and bake for 30-40 minutes or until juices run clear or the chicken registers 165 degrees when tested with a meat thermometer. The outside coating will be golden brown.
- Serve with wilted greens, pureed vegetables or a salad and either a Chablis, Chardonnay or Sauvignon Blanc for company!
Just so you know…..
- You can reheat Chicken Kiev, but the chicken may dry out and the filling can separate.
Nutrition
Love My Content? Buy Me a Coffee!
Creating these resources for you is my passion, and I love hearing how they’ve helped you on your health journey. If you appreciate my content and want to support my work, you can buy me a coffee to help fuel more tips, recipes, and inspiration. Every little bit means the world to me!